Will cider ferment in the fridge? The short answer is yes, but the fermentation process will be much slower and may stop (“cold crash”) altogether depending on the yeast strain used.
In this blog post, we will explore the various factors that contribute to successful cider fermentation and discuss the effects of refrigeration on this process.
By the end, you’ll have a better understanding of why fermenting cider in the fridge may not be the best idea and some alternative methods to try instead.
The Importance of Temperature in Fermentation
The Role of Yeast in Fermentation
Yeast is a crucial component in the fermentation process. These tiny microorganisms consume the sugar in the cider and convert it into alcohol and carbon dioxide, resulting in alcoholic cider.
Yeast is most active at certain temperatures, typically between 60-75°F (15-24°C). When the temperature is within this range, yeast can efficiently ferment the sugar, producing a tasty and well-balanced cider.
How Temperature Affects Fermentation Speed
When fermenting cider, temperature plays a significant role in determining the speed and efficiency of the process. As mentioned earlier, yeast thrives in temperatures between 60-75°F (15-24°C).
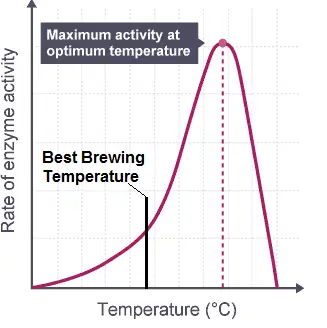
In this range, the yeast is most active and will quickly ferment the sugar in the cider. However, as the temperature decreases, the yeast’s activity slows down, resulting in slower fermentation.
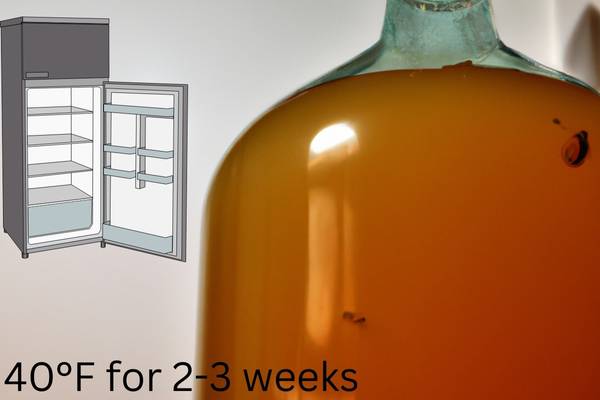
In the fridge, which is typically around 40°F (4°C), the yeast’s activity will be significantly reduced.
This means that fermentation will still occur, but at a much slower rate than if the cider were stored at room temperature.
Using bottom fermenting yeast to brew cider at low temperatures
Brewing cider with bottom-fermenting yeast at low temperatures is not a common practice.
Typically, bottom-fermenting yeast strains, such as lager yeast (Saccharomyces pastorianus), are used for brewing beer, while top-fermenting yeast strains, like ale yeast (Saccharomyces cerevisiae), are used for cider production.
However, if you want to experiment with using bottom-fermenting yeast for cider, here’s some information to consider:
- Yeast Selection: While lager yeast is generally used for making beer, it can potentially be used for cider as well. Keep in mind that lager yeast typically has a lower tolerance for the acidity and sugar levels found in cider, which may affect fermentation.
- Fermentation Temperature: Bottom-fermenting yeast strains, as the name suggests, ferment at lower temperatures compared to top-fermenting yeasts. They prefer temperatures in the range of 45-59°F (7-15°C). However, cider fermentation typically occurs at higher temperatures, around 55-68°F (12-20°C), to promote the desired flavors and fermentation characteristics.
- Flavor Profile: Using bottom-fermenting yeast for cider may result in a different flavor profile compared to traditional cider yeast strains. Lager yeasts tend to produce fewer fruity and estery flavors, which are typically desired in cider. Instead, they may produce cleaner and crisper characteristics more associated with beer.
- Fermentation Duration: Fermenting cider with bottom-fermenting yeast at lower temperatures may require a longer fermentation period. Bottom-fermenting yeast tends to ferment slower than top-fermenting yeast strains. You may need to be patient and allow for a longer maturation period before the cider is ready.
- Adjustments: Since bottom-fermenting yeast strains are not commonly used for cider, you may need to make adjustments to your recipe, including yeast nutrient additions, pH adjustments, and possibly a different fermentation vessel.
It’s important to note that experimenting with unconventional methods may yield unpredictable results, and the flavor outcome might not be what you expect.
If you’re looking to create a more traditional cider, it’s generally recommended to use a cider-specific yeast strain, such as Saccharomyces cerevisiae.
The Beneficial Effects of Slow Fermentation
Flavors and Aromas
When fermentation occurs at a slower rate, there is an increased risk of off-flavors and aromas developing in the cider. This is because the yeast may become stressed due to the cold temperature, causing it to produce undesirable compounds.
Additionally, slow fermentation can allow other microorganisms, such as bacteria, to compete with the yeast and potentially spoil the cider.
Incomplete Fermentation
Another potential issue with fermenting cider in the fridge is incomplete fermentation. Due to the yeast’s reduced activity, it may not be able to fully ferment all the sugar in the cider. This can result in a cider that is too sweet and has a lower alcohol content than desired.

Alternative Fermentation Methods
Using a Temperature-Controlled Fermentation Chamber
One way to ensure consistent fermentation temperatures and avoid the issues associated with fermenting in the fridge is to use a temperature-controlled fermentation chamber. These chambers can maintain a steady temperature within the ideal range for yeast activity, ensuring a successful fermentation process.
Utilizing a Cool Basement or Cellar
If you don’t have access to a temperature-controlled fermentation chamber, another option is to use a cool basement or cellar for fermentation. While the temperature may not be as consistent as a controlled chamber, it will likely be more stable than the fluctuating temperatures of a fridge. Just be sure to monitor the temperature regularly to ensure it stays within the ideal range for yeast activity.
Tips for Successful Cider Fermentation
1. Use fresh, high-quality ingredients – This includes using fresh, unpasteurized apple juice or freshly pressed apples and a quality cider yeast.
2. Sanitize all equipment – Ensure all equipment, including fermentation vessels and airlocks, is thoroughly cleaned and sanitized to prevent contamination.
3. Monitor temperature closely – Keep a close eye on the temperature during fermentation to ensure it stays within the ideal range for yeast activity.
4. Aerate the cider – Prior to pitching the yeast, aerate the cider by splashing it around or using a sanitized whisk to introduce oxygen. This will help promote healthy yeast growth.
5. Use a hydrometer – A hydrometer can help you track the progress of fermentation by measuring the specific gravity of the cider. This will give you an idea of how much sugar has been fermented and when the process is complete.
6. Allow for adequate fermentation time – Depending on the temperature and yeast strain, fermentation can take anywhere from one week to several weeks. Be patient and allow the yeast to do its job.
Conclusion
In conclusion, while cider can ferment at a range of temperatures including in the fridge, it is not the ideal environment for a successful fermentation process.
The cold temperatures slow down yeast activity, resulting in a longer fermentation time, an increased risk of off-flavors and aromas, and potentially incomplete fermentation.
Instead, consider using a temperature-controlled fermentation chamber or a cool basement or cellar to ensure the best results for your cider.
With proper temperature control and attention to detail, you can create a delicious, well-balanced cider that you’ll be proud to share with friends and family.
10 Key Facts About Cider Fermentation:
1. Yeast is a crucial component in cider fermentation.
2. Ideal fermentation temperatures are between 60-75°F (15-24°C).
3. Refrigerator temperatures (around 40°F/4°C) slow down yeast activity.
4. Slow fermentation can lead to off-flavors and aromas.
5. Incomplete fermentation can result in overly sweet cider with low alcohol content.
6. A temperature-controlled fermentation chamber can ensure consistent fermentation temperatures.
7. A cool basement or cellar can be an alternative location for fermentation.
8. Fresh, high-quality ingredients are essential for a successful cider.
9. Proper sanitation of equipment is crucial to prevent contamination.
10. Monitoring temperature, aerating the cider, and using a hydrometer can improve the fermentation process.
FAQs
Can you put cider in the fridge?
Yes, you can put cider in the fridge. In fact, refrigerating cider is a common practice to help preserve its freshness and slow down any potential fermentation or spoilage. Cold temperatures inhibit the growth of yeast and other microorganisms that can alter the taste and quality of the cider. By storing cider in the fridge, you can extend its shelf life and maintain its flavor profile for a longer period. It’s worth noting that different types of cider may have varying optimal serving temperatures, so it’s a good idea to check the specific recommendations for the cider you have.
Does apple cider turn to alcohol if you leave it long enough?
Yes, apple cider can turn into alcohol if you leave it long enough due to the natural fermentation process. Apple cider is made from apples that contain natural sugars, and yeast present on the apple skins or added during the brewing process consumes these sugars and converts them into alcohol and carbon dioxide through fermentation.
Fermentation occurs when yeast consumes the sugars in the cider and produces ethanol (alcohol) as a byproduct. The carbon dioxide is released as a gas, which is why you may see bubbles or experience some carbonation in fermented apple cider.
The length of time required for apple cider to turn into alcohol depends on various factors such as the sugar content, temperature, type of yeast, and the desired level of alcohol. Typically, it takes a few weeks to several months for apple cider to fully ferment and reach an alcohol content of around 4-8% ABV (alcohol by volume).
If you leave apple cider for an extended period without pasteurization or refrigeration, the fermentation process can continue, potentially resulting in higher alcohol content. However, this can also lead to the production of off-flavors and spoilage due to the growth of other microorganisms. It is important to monitor the cider’s progress and store it properly to prevent any undesirable outcomes.
How do you know when fermentation is finished?
As an expert brewer, I can provide a factual answer to the question: How do you know when fermentation is finished?
The most reliable way to determine if fermentation is finished is by taking specific gravity readings using a hydrometer or a refractometer. These tools measure the density of the liquid, which changes as sugars are converted to alcohol during fermentation.
To track fermentation progress, take an initial gravity reading before pitching the yeast. This is known as the original gravity (OG). As fermentation progresses, take additional gravity readings over time, typically every few days. When the gravity remains stable over several consecutive readings, fermentation is likely complete.
The final gravity (FG) reading should be close to the expected target for the beer style being brewed. This value is typically provided in the recipe or style guidelines. If the FG matches the expected range, it indicates that most of the sugars have been fermented, and the yeast has completed its job.
Another way to confirm fermentation completion is by observing the airlock activity. During active fermentation, you will see bubbles in the airlock as carbon dioxide is released. As fermentation slows down and nears completion, the airlock activity will decrease, eventually becoming almost non-existent.
However, relying solely on airlock activity can be misleading, as it can be influenced by factors like temperature, yeast strain, and other variables. Therefore, using gravity readings is the most accurate method to determine when fermentation is finished.
It is essential to allow sufficient time for fermentation to complete fully before packaging or transferring the beer. Prematurely packaging beer that is still fermenting can lead to carbonation issues, off-flavors, or even exploding bottles. Patience and gravity readings are key to ensuring fermentation is truly finished before proceeding with the next steps in the brewing process.
How do I know when my apple cider is done fermenting?
When determining if your apple cider is done fermenting, there are a few key factors to consider:
1. Specific Gravity: The most accurate method is by measuring the specific gravity of the cider using a hydrometer. Initially, take a reading before fermentation begins, and then monitor it regularly. As fermentation progresses, the specific gravity will decrease. Once the readings stabilize for several consecutive days, fermentation is likely complete.
2. Airlock Activity: Another indicator is the activity of the airlock. During active fermentation, you will notice bubbles or frequent movement in the airlock. As fermentation slows down, the airlock activity will decrease, eventually becoming minimal or stopping completely.
3. Taste and Aroma: Sampling your cider throughout the fermentation process is helpful. Initially, it will taste sweet, but as fermentation progresses, the sweetness will diminish, and the flavors will develop. When the cider tastes dry with no residual sweetness or off-flavors, fermentation is likely finished.
4. Time: Fermentation times can vary depending on various factors like yeast strain, temperature, and sugar content. Typically, apple cider fermentation takes around 1 to 2 weeks, but it can extend up to a month or more. It’s essential to be patient and allow enough time for the fermentation process to complete.
Remember, it’s crucial to ensure fermentation is truly complete before bottling to prevent potential issues like excessive carbonation or exploding bottles.
Can you ferment apple cider too long?
Yes, you can ferment apple cider for too long. Fermentation is the process by which yeast consumes the sugars in apple juice, converting them into alcohol and carbon dioxide. During fermentation, the yeast produces various byproducts, including flavors and aromas that contribute to the overall character of the cider.
However, if apple cider is fermented for an extended period, it can lead to undesirable outcomes. Firstly, over-fermentation can cause the cider to become too dry, as the yeast consumes all available sugars. This can result in a cider that lacks sweetness and balance.
Moreover, prolonged fermentation can lead to the production of off-flavors and off-aromas. Some yeast strains may produce excessive amounts of sulfur compounds, resulting in a rotten egg or sulfurous smell. Additionally, extended fermentation can cause the cider to develop a harsh or vinegar-like taste, known as “acetaldehyde” or “acetic acid” flavors.
To avoid these issues, it is essential to monitor the fermentation process and determine the desired level of sweetness and flavor profile. Typically, most apple ciders are fermented for a few weeks to a couple of months until they reach the desired taste. Once the cider has achieved the desired balance, it should be promptly transferred off the yeast sediment and stored appropriately to prevent further fermentation.
How long does apple cider take to ferment in the fridge?
Apple cider typically takes 2-4 weeks to ferment in the fridge. The exact duration can vary depending on factors such as the temperature, yeast strain used, and desired level of carbonation. Fermenting cider in the fridge slows down the fermentation process compared to fermenting at room temperature, which can take as little as 1-2 weeks. It is important to monitor the cider’s progress by checking the specific gravity or using other fermentation indicators to ensure it has reached the desired level of sweetness and alcohol content before bottling or consuming.