
As a seasoned brewer, I have always been fascinated by the process of making various beverages, and apple cider is one of them. It’s a delightful and refreshing drink with a rich history and a unique taste. However, when making it at home, one crucial step is often overlooked: pasteurization.
Ensuring your homemade apple cider is safe to drink is as important as the flavor itself. So, how do you pasteurize apple cider at home?
The simplest way to pasteurize apple cider at home is by heating it on the stove or in an oven. But I have also had success using a dishwasher!
The heat kills any bacteria, yeast, or molds that could potentially cause illness or spoil your cider. The process can be done on your stovetop using a large pot, a candy thermometer, and some time to keep an eye on the process.
What Is Pasteurization?
Before we dive into the process of pasteurizing apple cider, let’s understand what pasteurization is. Pasteurization is a process that kills microbes (such as bacteria and yeast) through heat. It was invented by Louis Pasteur in the 19th century and is widely used in food and beverage industries today to extend the shelf life of products and ensure they are safe for consumption.
Why Pasteurize Apple Cider?
Many people wonder why we need to pasteurize apple cider. The answer lies in the fact that unpasteurized apple cider can contain harmful bacteria, like E. coli, which can cause foodborne illnesses. Pasteurizing your apple cider ensures it is safe to drink and extends its shelf life, allowing you to enjoy your homemade concoction for longer.
Pasteurization of Cider In a Pot
The process of pasteurizing apple cider is relatively straightforward. You’ll need a large pot, a candy or brewing thermometer, your homemade apple cider, and a bit of patience.
The key to pasteurization is maintaining the right temperature for the correct amount of time.
Guide to Pasteurizing Cider on the Stove
Step 1: Gather Your Equipment
- Large pot: Choose a pot that can hold your cider with some extra space to prevent boil-overs.
- Thermometer: Use a reliable food thermometer to monitor the temperature accurately.
- Bottles or containers: Prepare clean and sanitized bottles or containers for storing your pasteurized cider.
Step 2: Prepare the Cider
- Pour the cider into the large pot, leaving some space at the top to prevent spills during heating.
- If you want to add any spices or flavors, do so at this stage.
Step 3: Heat the Cider
- Place the pot on the stove over medium heat. Gradually increase the heat to avoid sudden temperature changes that could affect the flavor and quality of the cider.
- Attach the thermometer to the side of the pot, making sure the probe is submerged in the cider but not touching the bottom.
Step 4: Monitor and Heat the Cider
- Monitor the temperature closely as the cider heats up. The goal is to reach a temperature of at least 160°F (71°C) for pasteurization.
- Avoid letting the cider boil, as excessive heat could alter its flavor and potentially cause it to foam and spill over.
Step 5: Hold the Temperature
- Once the cider reaches the target temperature, maintain it at or above 160°F (71°C) for at least 5 minutes. This is the crucial pasteurization step that eliminates harmful microorganisms.
- Stir the cider gently while it’s being heated to ensure even temperature distribution.
Step 6: Cool the Cider
- After pasteurization, remove the pot from the heat source.
- Allow the cider to cool down naturally or use an ice bath to speed up the process. Be cautious to avoid contamination during this stage.
- The cider should be cooled to around room temperature before bottling.
Step 7: Bottle the Cider
- While the cider is cooling, prepare your bottles or containers by cleaning and sanitizing them thoroughly.
- Once the cider has cooled sufficiently, use a funnel to pour it into the bottles, leaving about an inch of headspace at the top.
Step 8: Seal and Store
- Seal the bottles tightly with caps or lids.
- Store the pasteurized cider in a cool, dark place. Refrigeration is recommended to preserve its quality.
Common Pitfalls to Avoid:
- Overheating: Avoid excessive heat that could damage the cider’s flavor and quality. Stick to the recommended pasteurization temperature and duration.
- Boiling: Boiling the cider can cause it to foam and overflow, making a mess and potentially introducing contaminants.
- Under-pasteurization: Failing to reach the target temperature or maintaining it for the required time can leave harmful microorganisms intact.
- Contamination: Ensure all equipment, bottles, and containers are thoroughly cleaned and sanitized to prevent contamination during and after pasteurization.
By following this guide, you can successfully pasteurize your cider on the stove and enjoy a safe and flavorful beverage.
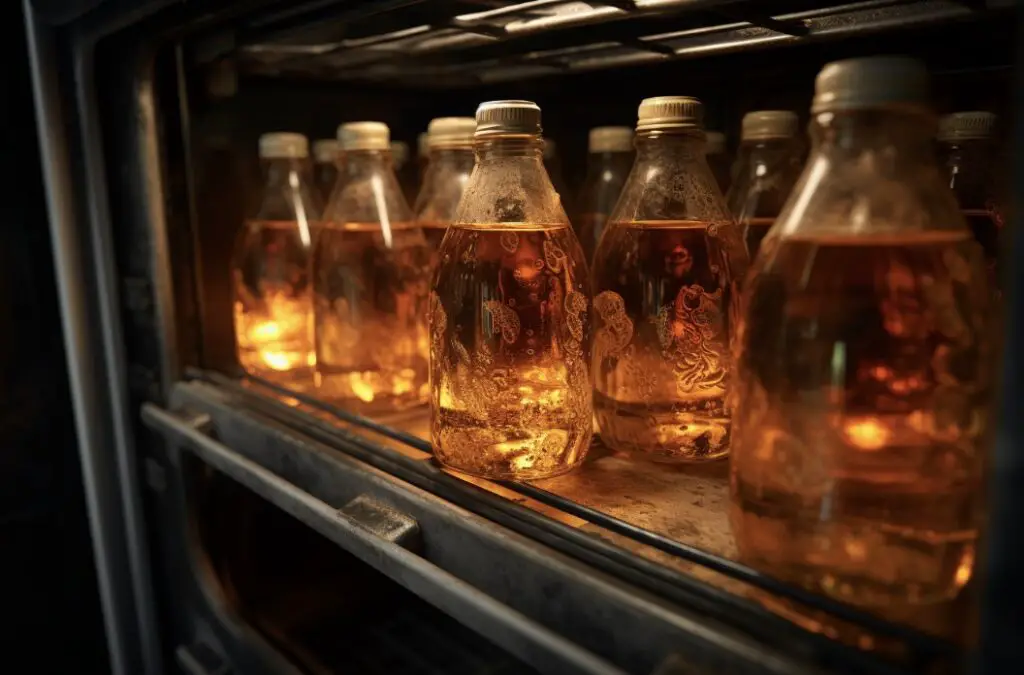
Pasteurize Cider in the Oven
Pasteurizing cider in the oven is a straightforward process that helps eliminate harmful bacteria and extend the shelf life of your cider while maintaining its flavor profile.
Here’s a step-by-step guide on how to pasteurize cider in the oven:
Step 1: Gather Your Supplies
- Freshly pressed or store-bought cider
- Oven-safe glass bottles or jars with lids
- Oven thermometer
- Baking sheet
- Timer
- Oven mitts
- Kitchen towels
Step 2: Preheat the Oven
- Preheat your oven to 160°F (71°C). Use an oven thermometer to ensure accurate temperature control. This is the temperature at which you’ll be pasteurizing the cider.
Step 3: Prepare the Bottles
- Thoroughly clean and sanitize your glass bottles or jars and their lids. Sterilization is crucial to prevent contamination during pasteurization.
Step 4: Fill the Bottles
- Carefully fill each bottle with your cider, leaving about 1 inch (2.5 cm) of headspace at the top. This allows for expansion as the cider heats up.
Step 5: Seal the Bottles
- Tightly screw on the lids of the bottles. Ensure they are closed securely to prevent any leaks during pasteurization.
Step 6: Place the Bottles on a Baking Sheet
- Arrange the filled and sealed bottles on a baking sheet. This helps with stability and prevents any spillage in case a bottle leaks or breaks.
Step 7: Oven Pasteurization
- Place the baking sheet with the bottles in the preheated oven.
- Set a timer for 10 minutes. It’s important not to overheat the cider, as this can affect its taste and quality.
- Monitor the temperature inside the oven using the oven thermometer. Adjust the oven temperature as needed to maintain a consistent 160°F (71°C) throughout the pasteurization process.
Step 8: Remove and Cool
- After 10 minutes of pasteurization, carefully remove the baking sheet from the oven using oven mitts.
- Place the baking sheet on a heat-resistant surface and allow the bottles to cool naturally. Do not try to speed up the cooling process, as rapid temperature changes can compromise the cider’s quality.
Common Pitfalls and Tips:
- Inaccurate Temperature: Ensure your oven thermometer is calibrated and accurate. An incorrect oven temperature can result in under-pasteurization or over-pasteurization.
- Bottle Explosions: Use glass bottles designed to withstand heat and pressure. Avoid using thin glass or jars not suitable for pasteurization.
- Inadequate Sanitization: Thoroughly clean and sanitize all equipment and bottles before use to prevent contamination.
- Overheating: Do not exceed 160°F (71°C) during pasteurization, as higher temperatures can negatively impact the flavor and quality of the cider.
- Rushing the Cooling Process: Allow the bottles to cool naturally to room temperature. Rapid cooling can cause breakage or thermal shock.
Remember that pasteurization is a way to extend the shelf life of cider by reducing the presence of harmful microorganisms. If you’re unsure about the process or have any concerns, it’s always a good idea to consult with a local food safety expert or follow guidelines from reputable sources.
Pasteurize Cider in the Dishwasher
Guide to Pasteurizing Cider in a Dishwasher
Pasteurizing cider in a dishwasher is a convenient and effective method to ensure the safety of your beverage by killing harmful microorganisms. Although dishwashers typically have a maximum temperature of around 65°C (149°F), lower than the 71°C (160°F) used in other methods like oven or stovetop pasteurization, you can still achieve pasteurization with a longer cycle.

Dishwasher cycles are usually longer, which compensates for the lower temperature. You can even opt for a lower temperature, down to 50°C (122°F), but that will require an extended cycle for proper pasteurization.
Pros of Dishwasher Pasteurization:
- Convenience: Using a dishwasher is straightforward and requires minimal supervision.
- Even Heating: Dishwashers provide consistent and even heating throughout the cider.
- Large Capacity: You can pasteurize a larger batch of cider in a single cycle.
Cons of Dishwasher Pasteurization:
- Extended Cycle: Dishwasher cycles are longer, which might be less time-efficient compared to other pasteurization methods.
- Lower Temperature: The lower maximum temperature might necessitate longer cycles, potentially affecting flavor and texture.
Steps to Pasteurize Cider in a Dishwasher:
Ingredients and Equipment:
- Unpasteurized cider
- Dishwasher
- Bottles or containers for storing pasteurized cider
Procedure:
- Prepare the Cider: Make sure your cider is well-filtered and free of debris. Bottled or strained cider works best for this method.
- Load the Dishwasher: Place your cider bottles or containers securely in the dishwasher’s racks. Make sure they are stable to prevent spillage during the cycle.
- Select the Cycle: Choose a longer cycle on your dishwasher. Look for a cycle that heats the water to its maximum temperature, usually around 65°C (149°F). If your dishwasher has an option to set a specific temperature, adjust it to around 65°C.
- Initiate the Cycle: Start the dishwasher cycle. The heating process will gradually raise the temperature of the cider-filled bottles to the desired pasteurization temperature.
- Monitor the Time: While dishwasher cycles are typically long, keep an eye on the timer to ensure that the cider reaches the pasteurization temperature and maintains it for the required duration.
- Extended Cycle for Lower Temperature: If you choose to use a lower temperature, such as 60°C (140°F) 50°C (122°F), you’ll need to extend the cycle significantly to compensate for the lower heat if you go with the lower temperature.
- Cooling Phase: After the cycle completes, the dishwasher will begin its cooling phase. Allow the bottles to cool down inside the dishwasher before removing them.
- Storage: Once the bottles are cooled, carefully remove them from the dishwasher. Seal them immediately to prevent contamination. Properly sealed and pasteurized cider can be stored for an extended period.
Remember that pasteurization is essential for cider safety, especially if you plan to store it for an extended period. While dishwasher pasteurization may take longer due to the lower temperature, the convenience and even heating can outweigh the drawbacks. Adjust the cycle duration according to the chosen temperature to ensure the safety and quality of your pasteurized cider.
Common Mistakes during Pasteurization
While pasteurization isn’t complicated, a few common mistakes could affect the quality and safety of your cider. Overheating the cider can change its taste, while underheating might not kill all the harmful bacteria. Monitoring the temperature accurately and maintaining it for the right duration is critical in successful pasteurization.
The Role of Equipment
Having the right equipment is essential in pasteurization. A large pot is necessary to hold your cider, and a reliable thermometer to accurately monitor the temperature. Also, remember to use sterile containers when bottling your cider to avoid introducing any new bacteria into your freshly pasteurized drink.
Conclusion
Pasteurizing apple cider at home is a simple process that can significantly improve the safety and longevity of your homemade beverage. With a bit of patience and the right equipment, you can ensure your cider is delicious and safe to drink.
To recap, here are some key facts about pasteurizing apple cider:
1. Pasteurization kills harmful bacteria that could cause illness or spoil your cider.
2. The process of pasteurization involves heating the cider to 160°F (71°C) and maintaining that temperature for at least one minute.
3. Overheating or underheating can impact both the safety and quality of your cider.
4. Pasteurized apple cider has a longer shelf life than unpasteurized cider.
5. You can pasteurize apple cider at home using a large pot and a reliable candy or brewing thermometer.
6. Remember to cool the cider quickly after pasteurization to preserve its flavor.
7. Always bottle pasteurized cider in sterile containers to avoid introducing new bacteria.
8. Pasteurization was invented by Louis Pasteur in the 19th century.
9. Pasteurizing apple cider not only makes it safe to drink but also enhances its taste by stabilizing the flavors.
10. Unpasteurized apple cider can contain bacteria like E. coli, hence the importance of pasteurization.
Remember, brewing is an art, and like any art form, it requires patience, precision, and passion. Happy brewing!
FAQs
Does boiling apple cider pasteurize it?
Yes, boiling apple cider can pasteurize it to some extent. Pasteurization is a process that involves heating a liquid to a specific temperature for a certain duration to kill harmful bacteria and pathogens. Boiling apple cider can help reduce the risk of foodborne illnesses by eliminating some of these microorganisms. However, it is important to note that boiling alone may not provide the same level of pasteurization as commercial methods. For complete and reliable pasteurization, it is recommended to follow proper industry standards and regulations.
Does boiling unpasteurized apple cider make it safe?
Boiling unpasteurized apple cider can help reduce the risk of certain pathogens, but it may not guarantee complete safety. Pasteurization is a specific process that involves heating the cider to a specific temperature for a specific duration to kill harmful bacteria, viruses, and parasites. While boiling can kill some microorganisms, it may not eliminate all potential pathogens present in unpasteurized cider. Therefore, it is advisable to consume commercially pasteurized apple cider to ensure safety.
How long should you boil unpasteurized apple cider?
Unpasteurized apple cider should be boiled for a minimum of one minute to ensure any potential harmful bacteria or pathogens are killed. However, it is recommended to boil it for at least 10 minutes to be on the safer side.
How do you pasteurize a bottle?
To pasteurize a bottle, you typically need to heat it to a specific temperature for a specific period of time. This process helps eliminate harmful bacteria and extend the shelf life of the contents. The exact method may vary depending on the type of product and bottle being used. Common approaches include using a pasteurization machine, hot water bath, or steam. It is important to follow proper guidelines and regulations to ensure effective pasteurization and food safety.
How do you pasteurize bottled cider?
To pasteurize bottled cider, you need to heat it to a specific temperature for a certain duration to kill any harmful bacteria or microorganisms. The most common method is called flash pasteurization, where the cider is rapidly heated to around 160°F (71°C) for a few seconds and then quickly cooled. This process helps preserve the cider’s flavor while ensuring it is safe to consume. It’s important to follow proper pasteurization guidelines to maintain quality and extend the shelf life of the bottled cider.
How do you make unpasteurized apple cider safe?
To make unpasteurized apple cider safe, it is important to follow certain guidelines. Firstly, ensure that the apples used for making cider are thoroughly washed and free from any contaminants. Secondly, the equipment and containers used for processing and storing the cider should be clean and sanitized. Additionally, it is crucial to maintain proper hygiene and sanitary practices during the entire cider-making process. Lastly, storing the cider at refrigerated temperatures can help inhibit the growth of harmful bacteria.