The art of brewing requires both technical skills and creative flair. One of the most critical components in homebrewing is the airlock.
But what exactly is it and how do you use one?
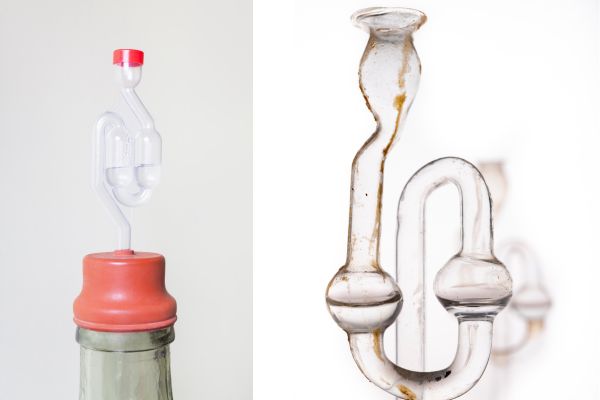
To put it simply, an airlock is a device that allows carbon dioxide to escape from your fermenter while preventing outside air (with oxygen!) and contaminants from getting in.
In this post, we will delve into the step-by-step process of using an airlock effectively to ensure a successful brew.
How do you use an airlock?
An airlock is a simple device that allows carbon dioxide (CO2) produced during fermentation to escape while preventing any unwanted air or contaminants from entering the fermenter.
Here’s a step-by-step guide on how to use an airlock properly:
Step 1: Prepare your fermentation vessel
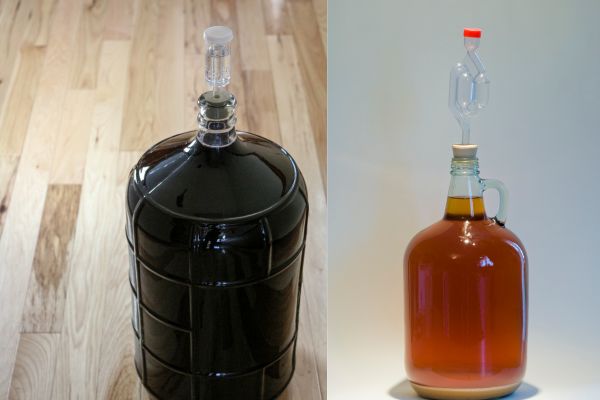
Choose a suitable fermentation vessel, such as a glass carboy or a food-grade plastic bucket. Ensure it is clean and sanitized to prevent any potential contamination.
Step 2: Add your wort to the fermenter
After boiling and cooling your wort, transfer it into the fermentation vessel. Be sure to leave some headspace at the top of the container to accommodate the foam and krausen produced during fermentation.
Step 3: Pitch your yeast
Add the yeast to the wort according to the manufacturer’s instructions. Make sure to handle the yeast correctly, as improper handling can lead to contamination or ineffective fermentation.
Step 4: Seal the fermenter
Securely seal the fermentation vessel with a sanitized lid or stopper that fits tightly. This ensures that the CO2 produced during fermentation can only escape through the airlock.
Step 5: Fill the airlock with sanitizer or clean water
Before inserting the airlock into the lid or stopper, fill it with a sanitizing solution or sterile water. This can be a solution of water and sanitizer, such as Star San, or even 40% ethanol (vodka!), which acts as a barrier against potential contamination.
Step 6: Insert the airlock
Insert the filled airlock into the pre-drilled hole on the lid or stopper. The airlock should fit snugly to create an airtight seal.
Step 7: Place the fermenter in a suitable location
Find a suitable location for your fermenter. It should be in a cool, dark area with a stable temperature, away from direct sunlight and temperature fluctuations.
Step 8: Monitor fermentation
As fermentation progresses, you’ll notice bubbles passing through the airlock. This is a sign that the yeast is actively producing CO2. The frequency of bubbles will vary depending on the fermentation activity and yeast strain.
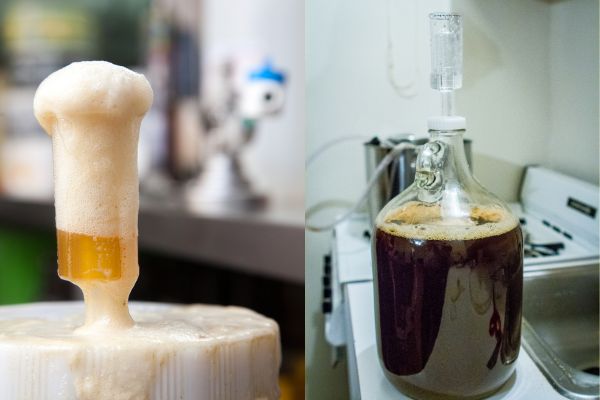
If any foam or liquid from the fermentation gets into the airlock, it is important to change the water as unwanted bacteria and fungi can otherwise grow in the airlock and contaminate your brew.
Step 9: Wait for fermentation to complete
Allow fermentation to complete according to your recipe’s guidelines or the specific gravity readings. The airlock will eventually stop showing bubbles, indicating that fermentation has finished.
Step 10: Package your brew
Once fermentation is complete, you can proceed to bottle or keg your brew, following the standard bottling or kegging procedures.
Throughout the entire process, it’s essential to maintain good sanitation practices to prevent contamination and off-flavors in your homebrew.
Always keep your equipment and surfaces clean, and handle everything with care to ensure the best possible outcome for your beer.
Common airlock problems and how to solve them
Homebrewers may encounter some common issues with airlocks during the fermentation process.
Here are solutions to address these problems:
1. Blowouts (Foam overflowing through the airlock):
Blowouts occur when the fermentation produces excessive foam (krausen) that pushes through the airlock, potentially causing a mess or contaminating the beer.
To prevent blowouts:
- Use a larger fermentation vessel: Choose a container with more headspace to accommodate the foam. A vessel with a higher volume than your batch size will help prevent blowouts.
- Use a blow-off tube: Instead of using a traditional airlock, insert a blow-off tube into the fermenter’s stopper or lid. The other end of the tube should be submerged in a container filled with sanitizer. The excess foam will be directed through the tube into the sanitizer, preventing any mess.
- Use a foam control agent: Some anti-foam products are available, specifically designed for brewers to reduce the formation of excessive foam during fermentation.
2. Airlock drying out:
If the airlock’s water or sanitizer evaporates or lowers below the required level, it can compromise the effectiveness of the airlock, allowing air and contaminants to enter the fermenter.
To avoid the airlock drying out:
- Monitor regularly: Keep an eye on the airlock’s fluid level daily, especially during the initial active fermentation phase.
- Refill with sanitizer: If you notice the water or sanitizer level has dropped significantly, top it up with a fresh batch of sanitized water or sanitizer to maintain an effective barrier.
3. Leaky connections:
A leak in the airlock setup can disrupt the fermentation process and introduce contamination. To address leaky connections:
- Check for cracks or damage: Inspect the airlock, stopper, or lid for any cracks or damage that might cause leakage. Replace any compromised components.
- Ensure a tight seal: Make sure the airlock fits snugly into the stopper or lid, providing an airtight and watertight seal. Use an appropriately sized stopper or grommet to create a secure connection.
4. Clogging of the airlock:
Sometimes, debris or excess krausen can clog the airlock, obstructing the release of CO2 and causing pressure buildup. To deal with a clogged airlock:
- Keep the airlock clean: Before and after each use, clean and sanitize the airlock thoroughly to remove any residue or contaminants.
- Use a blow-off tube: As mentioned earlier, consider using a blow-off tube during the most active fermentation phase to prevent clogging. It provides a larger opening for the foam and debris to escape.
By applying these solutions, homebrewers can manage and overcome common airlock-related challenges during fermentation, ensuring a successful brewing experience with minimal complications.
Understanding the Importance of an Airlock
Brewing beer or any fermented beverage requires creating the right conditions for yeast to thrive.
This involves maintaining an environment that is both oxygen-free and sterile. An airlock plays a pivotal role in achieving this.
By allowing carbon dioxide (a by-product of fermentation) to escape while preventing air from entering the fermenter, the airlock ensures that the fermentation process is uninterrupted and contamination-free.
Types of Airlocks
Before we jump into the how-to, it’s important to understand that there are different types of airlocks. The two most common types are the three-piece airlock and the S-shaped airlock.
Both work on the same principle of allowing gas to escape and preventing air from entering, but they are structured differently.
The three-piece airlock consists of a chamber filled with water, a cap, and a lid. The S-shaped airlock, on the other hand, is a single piece of equipment with a chamber for water and a cap.
Preparing the Airlock
The first step in using an airlock is preparing it for use. This entails cleaning it thoroughly to eliminate any potential contaminants. If you’re using a three-piece airlock, disassemble it and clean each part separately.
If you’re using an S-shaped one, clean it without disassembling. Use a no-rinse sanitizer to ensure a thorough clean.
After cleaning, fill the airlock half-way with water, sanitizer, or vodka. The liquid acts as a barrier, preventing air from entering while allowing CO2 to escape.
Installing the Airlock
After cleaning and filling your airlock, it’s time to install it. First, you need to make sure that your fermenter has a hole that can fit the airlock. If it doesn’t, you may need to drill a hole. Once your fermenter is ready, simply push the stem of the airlock through the rubber grommet in the lid of your fermenter. The airlock should fit snugly, but it shouldn’t be too tight.
Monitoring the Airlock
Once your airlock is in place, it’s important to keep an eye on it. The bubbling in the airlock is a sign that fermentation is taking place.

If there’s no bubbling after 48 hours, it could mean that there’s a problem with your yeast or your airlock isn’t sealed properly.
If the fermentation is especially vigorous, the airlock might get clogged, risk blowing off, or the liquid might get sucked into the fermenter. To prevent this, you can use a blow-off tube instead of an airlock during the initial stages of fermentation.
Cleaning the Airlock
After fermentation is complete, remove the airlock and clean it thoroughly. Again, use a no-rinse sanitizer to ensure a thorough clean. If your airlock is clogged, you may need to soak it in warm water before cleaning. Once clean, dry it thoroughly before storing it away.
Maintaining Your Airlock
Regular maintenance of your airlock can go a long way in ensuring its longevity. Always check it for cracks or leaks before use. If you notice any, it’s time to replace it. A damaged airlock can compromise the fermentation process, so it’s better to be safe than sorry.
Conclusion
Brewing is a science and an art that requires patience, skill, and the right tools. One of these tools is the airlock, which plays a crucial role in the fermentation process. By using an airlock correctly, you can ensure that your brew ferments perfectly, resulting in a delicious final product.
10 Facts About Airlocks:
1. Airlocks are used to create an oxygen-free environment for fermentation.
2. They allow CO2 to escape while preventing air from entering.
3. The two most common types of airlocks are the three-piece and the S-shaped airlocks.
4. The airlock needs to be cleaned and sanitized before use.
5. The airlock is filled half-way with liquid to create a barrier against air.
6. The hole in your fermenter needs to be the right size to fit the airlock.
7. Bubbling in the airlock is a sign of fermentation.
8. A blow-off tube can be used instead of an airlock during vigorous fermentation.
9. The airlock needs to be cleaned and dried after use.
10. Regular maintenance of the airlock ensures its longevity.
FAQs
What liquid do you use in an airlock?
The liquid typically used in an airlock is a sanitizing solution, such as a mixture of water and sanitizer. This solution helps create a barrier between the outside air and the fermenting liquid, preventing any potential contamination from entering the fermentation vessel.
What do you put in airlock Mead?
In an airlock used for mead making, you typically put a sanitizing solution or water to create a barrier between the fermenting mead and the outside environment. This helps prevent contamination while allowing gases produced during fermentation to escape.
Do you put water or alcohol in an airlock?
In an airlock, it is common to use a liquid such as water or alcohol. Water is the most commonly used liquid as it is readily available and inexpensive. However, some people prefer using alcohol, such as vodka or sanitizer, as it has a lower risk of contamination. Both water and alcohol work effectively to create a barrier and prevent air or contaminants from entering the fermentation vessel.
What happens if you don’t use an airlock?
If you don’t use an airlock in certain situations, such as in space or in a high-containment laboratory, it can have serious consequences. An airlock is designed to control the flow of air and maintain different pressure levels between two areas. Without an airlock, there is a risk of rapid decompression, which can be fatal in space or cause the release of hazardous materials in a lab. Additionally, an airlock helps prevent contamination by keeping unwanted particles, gases, or organisms from entering a controlled environment.
Can you brew without an airlock?
Yes, it is possible to brew without an airlock. An airlock is commonly used in fermentation to allow carbon dioxide to escape while preventing oxygen and contaminants from entering the vessel. However, there are alternative methods such as using a blow-off tube or even loosely covering the container with a sanitized cloth or plastic wrap. The key is to ensure that a proper seal is maintained to prevent unwanted bacteria or wild yeast from contaminating the brew.


