
Mead brewing is a centuries-old craft that has been enjoyed by many cultures around the world. From its ancient beginnings to modern day, mead continues to be popular among home brewers and enthusiasts alike.
Making your own mead can be an incredibly rewarding experience as you get to experiment with different types of honey, create unique taste variations and learn about how long fermentation should take place for optimal flavor profiles.
In this blog post we’ll explore what mead is, its history, how it’s brewed and all the delicious ways you can enjoy it! So join us on our journey into the fascinating world of mead brewing!
What is Mead?
Mead is a wine made from fermented honey. It has been brewed in many cultures around the world for centuries, and its flavor can range from sweet to dry.
The main ingredients of mead are honey, water, yeast, and sometimes added fruits or spices. The type of honey used affects the flavor of the mead; lighter honeys tend to produce a sweeter drink while darker honeys create a more robust taste.

Yeast helps to convert sugars into alcohol during fermentation which gives mead its distinct flavor profile. Depending on how long it ferments, mead can have anywhere between 5-20% ABV (alcohol by volume).
Brewing mead requires patience as it takes several weeks or even months for fermentation to complete before you can enjoy your homemade brew!
To make traditional mead at home you will need:
- Honey
- Water (preferably spring or distilled),
- Yeast nutrient (optional but recommended),
- Wine yeast such as Lalvin EC-1118 or Red Star Cote des Blancs
- Campden tablets or other antimicrobial chemical (for sterilization).
You may also choose to add fruit juices or spices like cinnamon sticks for additional flavors.
Once all your ingredients are gathered together you’ll want to mix them together in a sanitized fermenter with enough room for foam that will be created during fermentation process. After adding all the ingredients except the yeast you should let this mixture sit overnight so that any wild yeasts present in your environment can die off due to lack of nutrients provided by campden tablets.
On day two add activated wine yeast according to package instructions then cover with airlock lid and wait patiently until bubbling stops indicating that fermentation is complete usually about 3-4 weeks later depending on temperature control etc.. Once bubbling stops rack off sediment leaving clear liquid behind ready for bottling!

When serving up your homemade brew, remember that since there is no carbonation present in traditional still meads, they should be served chilled rather than cold like beer would be enjoyed best at cellar temperatures between 40°F and 55°F.
If desired, carbonation levels can be achieved through secondary bottle conditioning using priming sugar; however, this method does require extra time as well as careful monitoring of pressure buildup inside bottles over time, so proceed cautiously if attempting this technique at home.
Mead is an ancient alcoholic beverage made from fermented honey, and it can be a great addition to any home brewer’s repertoire. Now let’s look at the basics of mead brewing!
What does mead taste like?
It has a sweet, yet slightly tart flavor with hints of floral and fruity notes. Depending on the type of mead being brewed, it can also have subtle flavors of spices or herbs added to it. The alcohol content in mead ranges from 8-20%, making it stronger than beer but weaker than wine. Overall, mead is a unique drink that can be enjoyed by itself or as part of a cocktail.
Main Takeaway: Mead is an ancient alcoholic beverage made from fermented honey and water that has a range of sweet to dry flavors. To make traditional mead at home, you will need raw unfiltered honey, water (preferably spring or distilled), yeast nutrient (optional but recommended), wine yeast such as Lalvin EC-1118 or Red Star Cote des Blancs and campden tablets (for sterilization). Additionally, you can add fruit juices or spices for additional flavor. Mead should be served chilled rather than cold and if desired carbonation levels can be achieved through secondary bottle conditioning using priming sugar.
History of Mead
It has been brewed for centuries in many different cultures around the world, with evidence of its production dating back to 7000 BC. Ancient Greeks and Romans were known to enjoy mead, as were Vikings and other northern Europeans. In some cultures, mead was even used as a form of currency.

The oldest written recipe for mead dates back to 800 BC in Greece, where it was called “hippocras” or “hippokras”. This recipe included honey, spices such as cinnamon and ginger, wine or beer yeast, and sometimes herbs like rosemary or thyme. The mixture would be left to ferment until it reached the desired strength – usually between 10-15% alcohol by volume (ABV).
In medieval Europe, during the Middle Ages, mead was popular among both royalty and commoners alike due to its availability and relatively low cost compared to other alcoholic beverages at the time.
Monks also brewed large quantities of mead for religious ceremonies such as weddings or coronations; this practice continued into modern times with special varieties being produced exclusively for these occasions.
Mead has also had a long history in North America since colonial times when settlers brought their recipes over from Europe; however it wasn’t until recently that commercial production began on a larger scale thanks largely in part to craft breweries embracing traditional brewing methods combined with modern techniques which have allowed them to produce high quality products quickly without sacrificing flavor or complexity.
Today, there are numerous types of meads available ranging from dry sparkling styles similar to champagne all the way up through sweet dessert wines made with fruits or spices added during the fermentation process.

Each offering unique flavors depending on what ingredients are used to create them. No matter your preference though, one thing remains true: Mead is an ancient drink steeped in rich history that continues to live today thanks to passionate brewers who keep the tradition alive while pushing boundaries to explore new possibilities within this timeless craft.
Mead has been around for centuries, and its popularity continues to this day. Now let’s explore the process of making mead at home.
Main Takeaway: Mead is an ancient alcoholic beverage with evidence of its production dating back to 7000 BC. Throughout history, it has been enjoyed by many cultures around the world and was even used as a form of currency in some. Today, there are numerous types available ranging from dry sparkling styles to sweet dessert wines made with fruits or spices added during fermentation. Whether you prefer traditional recipes or modern craft brews, mead offers something for everyone thanks to passionate brewers who keep the tradition alive while exploring new possibilities within this timeless craft.
Brewing Mead
Brewing mead is a simple and rewarding process that can be done with just a few basic ingredients. To begin, you will need honey, water, yeast, and optionally additional flavors like fruits or spices.

The first step in brewing mead is to mix the honey and water together in a fermenter. Depending on the type of mead you are making, different ratios of honey to water may be used.
For example, for traditional dry meads use 1 part honey to 4 parts water; for sweet meads use 1 part honey to 3 parts water; and for semi-sweet or sparkling meads use 1 part honey to 2 parts water. Once mixed together thoroughly, add your chosen yeast strain according to package instructions.
Fermentation
Next comes fermentation – this is where the magic happens! The yeast consumes the sugars from the honey and converts them into alcohol as well as carbon dioxide (CO2). During this stage it’s important not to disturb your fermenter too much so that all those wonderful aromas don’t escape!
Fermentation typically takes between two weeks up until several months depending on how strong you want your final product to be.
Bottling
Once fermentation has finished it’s time for bottling! Make sure you have enough bottles ready before starting this process as some of them may break during transportation or filling if they aren’t properly handled.
When transferring your brew from its primary fermenter into bottles make sure there’s little oxygen present by using a system such as an auto-siphon racking cane which helps minimize oxidation.
Tips for serving
Finally comes serving – now it is time for everyone else around you, or just yourself, to enjoy what was made with love over many weeks or months prior. Mead can be served chilled or at room temperature depending on preference, but either way should always come with a glass full of ice cubes if desired since its ABV content tends towards higher levels than most other alcoholic beverages due to its natural sugar content coming from honey itself. Cheers.
Brewing mead can be an exciting and rewarding experience, but it is important to understand the process and ingredients before getting started. Now let’s look at how to get started with your mead brewing journey!
Main Takeaway: Brewing mead is a simple and rewarding process that requires honey, water, yeast and optionally additional flavors like fruits or spices. Fermentation takes two weeks to several months depending on desired strength.
All the Equipment You’ll Need
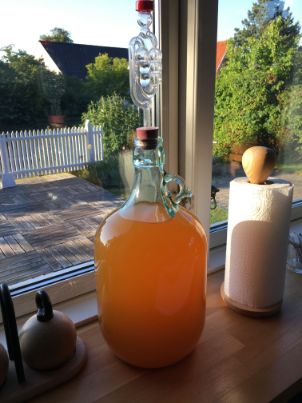
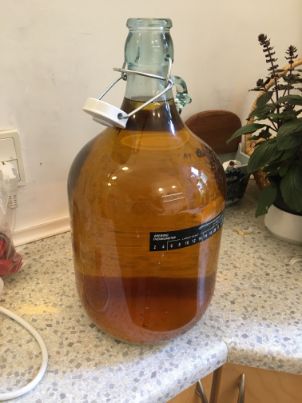
When it comes to making mead at home, the right equipment is essential. To get started, you’ll need a glass gallon carboy or any food-grade, sanitized gallon container.
This is where your mead will ferment and carbonate during the brewing process.
You’ll also need an airlock and rubber stopper that fits snugly into the top of your carboy. The airlock allows carbon dioxide to escape while preventing anything from getting in that could contaminate your mead.
Mead Brewing Starter Kit

Fastest way to get brewing!
This simple mead kit contains everything you need (except the honey) to get started brewing mead!
- 1 gallon quality glass carboy
- Lalvin yeast + nutrients included
- Funnel, airlock, siphon, cleaning agents
- A step by step guidebook and advice.
A starter kit should include all these items plus other necessary supplies like tubing for siphoning off liquid when needed and a hydrometer for measuring alcohol content after fermentation has completed.
In addition to the basic equipment listed above, there are some additional items you may want depending on how involved you plan on getting with your mead brewing project:
- Yeast nutrient – this helps ensure proper fermentation by providing yeast cells with necessary nutrients
- Campden tablets – these help eliminate wild yeasts or bacteria that can affect flavor
- pH strips – used to measure acidity levels in order to adjust sweetness levels
- Finings used at end of fermentation process to clarify finished product
Finally, don’t forget about bottles! You’ll need them once it’s time to bottle up your mead so make sure you have enough on hand before beginning the brewing process.
With all this equipment ready-to-go, you’re now set up for success as a home brewer!
How to Make Mead: Step-by-step
Ingredients:
- 1 gallon of water
- 3 lbs of honey
- Yeast (wine, mead or beer yeast)
- Citric acid, tannin andor other additives (optional)
Tools:
- Large pot for boiling the mixture
- Glass gallon carboy with airlock stopper
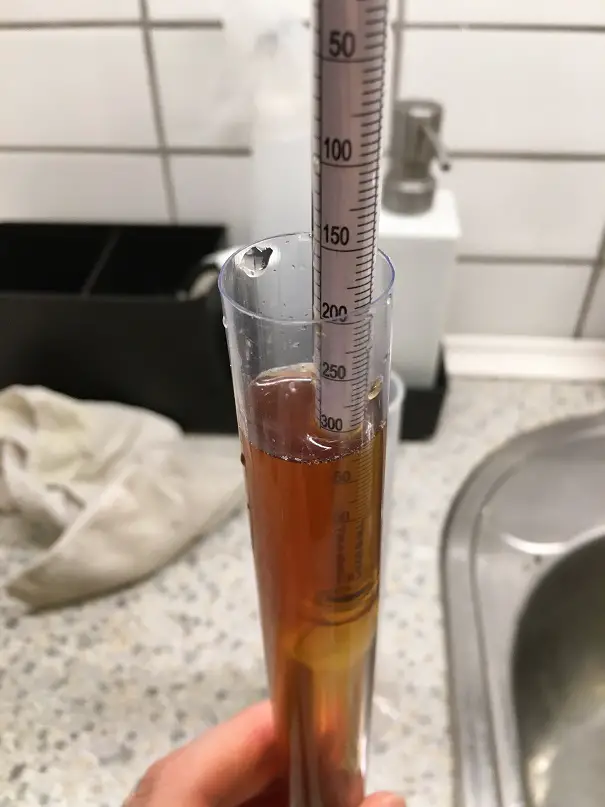
- Hydrometer (optional but recommended)
Instructions:
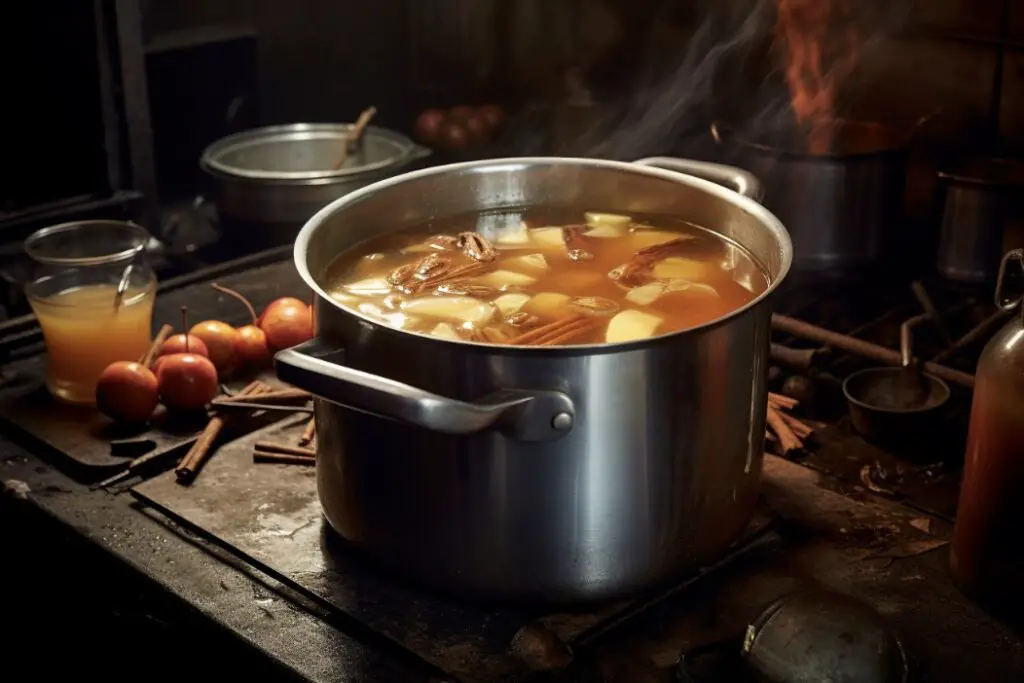
- Boil 1 gallon of water in a large pot on the stove. Once it reaches a rolling boil, turn off the heat and add 3 lbs of honey to the hot water. Stir until all of the honey is dissolved into the liquid.
- Cool down your mixture by placing it in an ice bath or letting it sit at room temperature overnight before you proceed to step three. This will help ensure that you don’t kill your yeast when adding them later on!
- Once cooled, pour your mixture into a clean glass carboy and attach an airlock stopper to its top opening so that carbon dioxide can escape during fermentation without oxygen entering in which could spoil your mead.
- Now add either wine or beer yeast according to package instructions usually about one packet per 5 gallons and stir gently until combined with no clumps remaining visible in solution. Optionally, you may also choose to add citric acid, tannin andor other additives at this time as well for flavor enhancement purposes if desired; however these are not necessary for basic mead making processes like this one!
- 5a). If using a hydrometer take a reading now before proceeding further so that you can calculate how much alcohol content is present after fermentation has completed later on; otherwise skip ahead to step five b).
- 5b). Insert airlock and stopper into top opening of carboy containing mixture from steps 1 through 4 above then fill airlock halfway up with cool tap water prior to sealing shut completely so that carbon dioxide can escape while keeping oxygen out during fermentation process without any contamination occurring inside container itself!
- Place container in warm dark place away from direct sunlight where temperatures remain consistent throughout day & night cycles – between 65°F & 75°F is ideal – then wait patiently while nature does its thing over next 7 days or longer depending upon specific recipe used & environmental conditions present within area chosen…fermentation should begin within 24 hours following initial setup phase described here today!
Apart from the actual brewing process, it is important to santitize all your equipment before adding your boiled honey mixture.
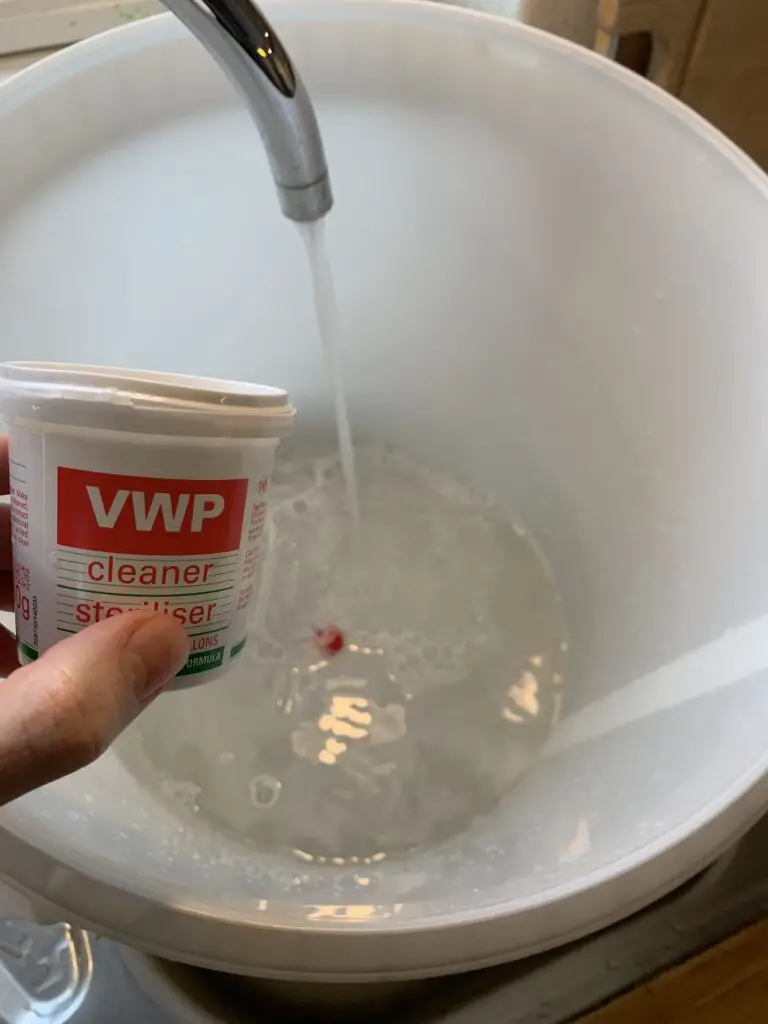
A final note on sanitation: Mead can be subject to different contaminants than other beverages as honey sometimes contains spores of the bacteria known as “clostridia”.
These can, in very rare cases, lead to botulism so I wrote a full guide on this topic and how to avoid botulism in mead here.
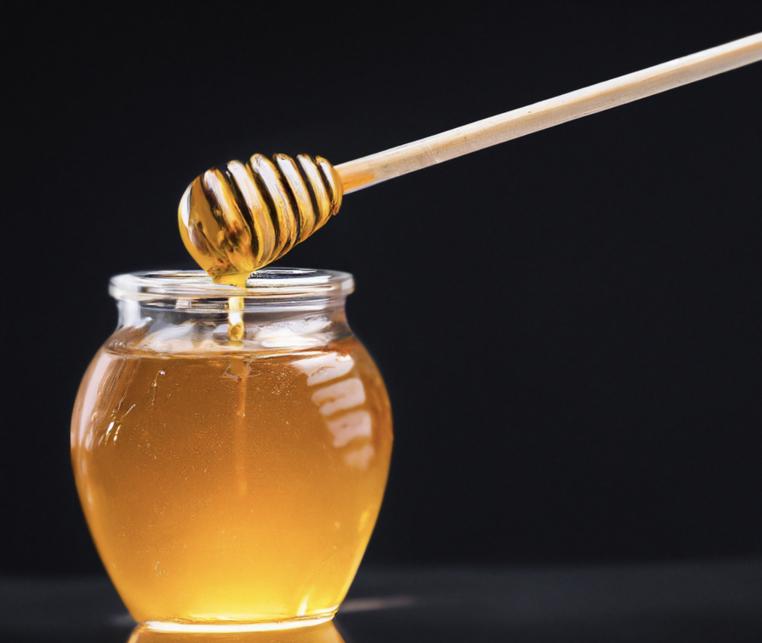
What kind of honey is best for mead?
When it comes to brewing mead, the type of honey you use is a key factor in determining the flavor and quality of your final product. There are many different types of honey available on the market, so it can be difficult to know which one is best for making mead. Generally speaking, light-colored honeys tend to produce lighter-bodied meads with more subtle flavors while darker honeys will create fuller-bodied drinks with richer aromas and tastes.
Raw Honey
Raw honey is unprocessed and contains all of its natural enzymes, vitamins, minerals, and antioxidants that give it unique flavor profiles depending on where the bees gathered their nectar from.

This type of honey tends to have a stronger taste than processed varieties since none of its beneficial compounds have been removed or altered during processing.
It also has higher levels of yeast nutrients which helps speed up fermentation time when used in mead making. The downside is that raw honey can be expensive due to its limited availability and shorter shelf life compared to other kinds.
Varietal Honey
Varietal honeys come from specific plants such as clover or orange blossom rather than a mix sourced from multiple locations like regular store bought brands do.

These single source honeys offer distinct flavors based on what kind they are made from; for example clover honey has a milder taste while orange blossom has citrus notes that pair well with certain fruits used in some recipes for mead making.
They usually cost more than regular store bought varieties but not as much as raw ones do due to their longer shelf life thanks to pasteurization processes they go through before being sold commercially.
Blended Honey
Blended honeys are created by mixing together several varietals into one jar or bottle, allowing producers to create unique combinations with various flavor profiles at an affordable price point compared to buying individual varietals separately.


However, these blends don’t contain any special characteristics found in pure varietal honeys and thus won’t add anything extra special when used for brewing purposes. Nevertheless, they still make great alternatives if budget constraints prevent one from getting something better suited specifically for creating delicious batches of homemade mead.
When it comes to making mead, the type of honey you use can make all the difference in flavor and complexity. Different honeys have different sugar levels, acidity, and aromas that will affect your finished product. Next we’ll explore how to choose the right honey for your mead recipe.
Main Takeaway: When it comes to brewing mead, the type of honey you use can have a big impact on the flavor and quality of your final product. Raw honey is unprocessed and contains all its natural enzymes which helps speed up fermentation time but can be expensive due to its limited availability. Varietal honeys come from specific plants such as clover or orange blossom and offer distinct flavors depending on what kind they are made from. Blended honeys are created by mixing together several varietals into one jar or bottle, making them an affordable alternative if budget constraints prevent one from getting something better suited specifically for creating delicious batches of homemade mead.
How Much Honey Should I Use?
When it comes to making mead, the amount of honey you use can make a big difference in how sweet your final product is. Generally speaking, two to three pounds of honey per gallon of mead is recommended.
If you want a dryer mead, opt for two pounds; if you’d like it sweeter, go with three.
It’s important to note that the type of honey used will also affect the sweetness level and flavor profile.
Darker honeys tend to have more intense flavors and higher sugar content than lighter varieties — so if you’re looking for an extra-sweet mead, try using dark buckwheat or chestnut honey instead of clover or orange blossom.
The other factor that affects sweetness levels is fermentation time — longer fermentation times usually result in less residual sugar (and therefore less sweetness).
So if you’re aiming for a drier mead but don’t want to skimp on the honey, consider extending your fermentation period by several weeks or months until desired taste is achieved.
Finally, keep in mind that adding too much honey can lead to off-flavors and aromas due to over-fermentation — so be sure not to exceed 3 lbs per gallon unless instructed otherwise by an experienced brewer! With these tips in mind, happy brewing!
Types of Mead and Taste Variations
Mead is an ancient alcoholic beverage made from fermented honey and water. It has been enjoyed for centuries, but in recent years its popularity has grown as home brewers have discovered the joys of crafting their own mead.
There are many different types of mead that can be brewed at home, each with its own unique flavor profile and characteristics.
Traditional Mead: Traditional mead is the most basic type of mead and is made simply by fermenting honey and water together.
This type of mead tends to be sweet with a light floral aroma and a dry finish. The alcohol content can range from 8-20%, depending on how much honey was used in the fermentation process.
Spiced Mead: Spiced meads are traditional meads that have had spices added during fermentation or after aging to give them more complexity and depth of flavor.
Common spices used include cinnamon, nutmeg, cloves, allspice, ginger, cardamom, coriander seed or vanilla bean.
These spiced flavors will complement the sweetness of the honey while adding some subtle notes to create a unique flavor profile for your finished product.
Fruit Mead (Melomel):
Fruit meads (also known as Melomels) are created by adding fruit juice or puree during fermentation or after aging to add new flavors into your brews such as apples (Cyser), grapes (Pyment), cherries (Cherry Melomel) or peaches (Peach Melomel).
These additions can help balance out any overly sweet elements while creating a delicious blend between fruity tartness and mellow sweetness that makes these drinks so enjoyable!
Herbal Metheglin Mead:
Metheglin style meads are similar to spiced ones but use herbs instead of spices for flavoring purposes; common examples include lavender metheglin or chamomile metheglin which both provide delightful aromas along with complex herbal flavors that make them stand out among other styles!
They’re also great when paired with food dishes due to their ability to bring out certain tastes in foods like meats & cheeses – making them perfect accompaniments for dinner parties!
Other Taste Considerations
It can be made in a variety of styles that range from sweet to dry depending on how much honey is used in the recipe. Additionally, adding different fruits or spices can create unique flavor profiles that are tailored to individual tastes.
When it comes to sweetness, mead can range from very sweet with high residual sugar levels all the way down to bone-dry with no detectable sweetness at all.
The amount of honey used will determine where your mead falls on this spectrum; more honey means sweeter mead while less honey results in a drier version. If you want something truly special, try using multiple types of honeys for even more complexity and depth of flavor!
Fruits are another great way to add interesting flavors and aromas to your mead. Berries like raspberries or blackberries work well as do stone fruits such as peaches or apricots – just make sure they’re ripe enough so their natural sugars don’t overpower the delicate floral notes found in most traditional meads. You could also experiment with citrus fruits like oranges or lemons for a tart twist on classic recipes!
Spices are yet another way to customize your own unique blend of mead. Popular choices include cinnamon sticks, cloves, nutmeg and ginger root but feel free to get creative here too – why not try cardamom pods for an exotic touch? Just remember that spices should always be added sparingly so their flavors don’t overwhelm the other ingredients!
Finally, if you really want something out-of-the ordinary then consider aging your finished product in oak barrels previously used for wine or whiskey – this will impart additional tannins into the mix which gives it a smooth texture and complex aroma reminiscent of aged spirits!
No matter what kind of taste variations you choose when brewing up some homemade mead, one thing remains constant: have fun experimenting until you find what works best for you.
Different types of mead can offer a wide range of flavor profiles, from sweet and fruity to dry and tart. Next, we’ll look at the different techniques for fermenting mead.
Main Takeaway: Mead brewing is an enjoyable and creative way to make a unique alcoholic beverage. To get started, you’ll need honey, water, yeast and your own personal touch of creativity. You can adjust the sweetness level by adding more or less honey, add fruits for interesting flavors and aromas or spices for a special twist. Finally, consider aging your mead in oak barrels for added complexity! • Honey • Water • Yeast • FruitsSpices • Oak Barrels (optional)
How long should I let my mead ferment?
Mead fermentation is an important step in the brewing process. It’s during this time that your mead will transform from a sweet, honey-based beverage into something with more complexity and character. The length of time you let your mead ferment can have a big impact on its flavor profile, so it’s important to understand how long you should wait before bottling.
Factors That Affect Fermentation Time:
The amount of sugar in the must (the mixture of honey and water used to make mead) is one factor that affects fermentation time. A higher sugar content means more food for yeast, which can lead to faster fermentation times.
Additionally, the type of yeast used also plays a role in determining how quickly your mead ferments; some strains are quicker than others.
Temperature also has an effect on fermentation speed; warmer temperatures tend to result in shorter fermentations while cooler temperatures may take longer.
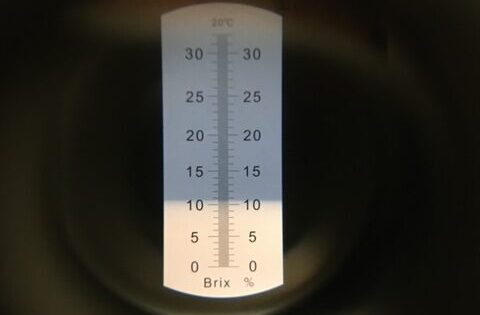
Finally, the specific gravity (SG) or density of the must also impacts fermentation duration—a lower SG indicates less sugar present and thus slower fermentation rates. I prefer to measure Brix using a refractometer as it requires much less sampling.
General Guidelines:
Generally speaking, most homebrewers allow their meads to ferment for at least two months before bottling them up for consumption or aging purposes. This gives enough time for all components—including alcohol levels—to reach desired levels without sacrificing flavor quality or risking contamination due to extended exposure to air or other elements found within the environment where it’s being stored/fermented . For lighter-bodied styles like traditional dry meads and melomels (meads made with fruit), three months is usually recommended as optimal aging time before bottling begins; however if you’re looking for something sweeter then four months might be better suited depending on taste preferences .
Racking & Secondary Fermentations:
In addition to allowing primary fermentations adequate amounts of rest/aging prior to bottling , many brewers opt for racking their batches over into secondary vessels after primary completion has been reached . Doing so helps further clarify liquid by removing sedimentation created throughout active phases while giving flavors additional opportunity develop even further over extended periods – sometimes lasting up six months or longer! If opting out this route , simply keep track when primary phase ends and begin sampling periodically until desired results are achieved .
Ultimately, deciding when to bottle your finished batch comes down to personal preference – whether you are aiming to create a light-bodied traditional style meady melomel blend or something bolder and sweeter. Understanding the factors affecting the overall timeline is key in ensuring a successful end product.
The fermentation process for mead is an important step in the brewing process, and can take anywhere from a few weeks to several months depending on the desired results. Now let’s look at what ingredients are needed for mead brewing.
Main Takeaway: A key takeaway from the above is that mead fermentation requires patience and understanding of the factors that affect its timeline. These include sugar content, type of yeast used, temperature, and specific gravity (SG). Generally speaking, most homebrewers allow their meads to ferment for at least two months before bottling them up for consumption or aging purposes. Racking into secondary vessels after primary completion can also help further clarify liquid by removing sedimentation created throughout active phases while giving flavors additional opportunity develop even further over extended periods – sometimes lasting up six months or longer!
How to Clarify Mead?
It can be a sweet or dry drink, depending on the amount of sugar used in the fermentation process. However, one common problem that many home brewers encounter when making mead is clarity. Unclear mead can have a cloudy appearance and affect its flavor profile as well. Fortunately, there are several ways to clarify your mead so it looks great and tastes even better!
Cold Crashing: Cold crashing mead involves clearing your mead by quickly cooling it down for a while before bottling to encourage suspended particles to settle out of suspension faster than they would at room temperature.
To cold crash your mead, transfer it into another container (like a carboy) and store it in a refrigerator for 1-2 weeks until all sediment has settled out of solution.
This method works best with lighter styles of meads such as melomels or cysers which don’t contain too much tannin or other compounds that could interfere with clarification.

Fining Agents: Fining agents are substances added to the must prior to fermentation that help attract suspended particles in solution so they can be more easily removed during racking or filtering processes later on in the brewing process.
Common fining agents include gelatin, bentonite clay, Irish moss, Sparkolloid powder and Polyclar 10X finings among others; each type having its own unique properties for clarifying different types of beverages like beer wine and mead etc..

Be sure to follow manufacturer instructions when using any kind of fining agent since overuse may cause off flavors due to excessive removal of desirable components from the must/mead itself!
Pectinase: Pectinase, or pectic enzyme, is an enzyme specifically designed for breaking down pectins found naturally occurring within fruit juices which can contribute towards haze formation if left unchecked during fermentation processes involving fruit additions such as melomel recipes etc..
Adding pectic enzymes will help break down these pectins into smaller molecules allowing them more readily dissolve into solution thus helping reduce potential haziness issues associated with certain styles of fruited beers/meads/meads etc.. Be sure not use too much though otherwise you risk adversely affecting head retention qualities within finished products!

The last option available for clarifying hazy looking beverages like beer, wine, mead and mead alike is filtration through various filter pads ranging from coarse filters up through fine micron rated filter pads. This should remove most suspended solids present within liquid solutions leaving behind crystal clear product ready for packaging and consumption.
Just remember however that filtering does come at cost since some desirable flavor compounds may also get filtered out along the way so use this method sparingly where possible instead opting firstly to try cold crashing and adding appropriate amounts of fining agents whenever possible instead.
Clarifying your mead is an important step to producing a great-tasting beverage. Next, we’ll look at how to add flavor and carbonation to your mead.
Main Takeaway: Mead brewers can clarify their mead and improve its flavor profile by using a variety of methods, including cold crashing, fining agents such as gelatin or bentonite clay, pectinase enzymes, and filtration.
How to Back Sweeten Mead
Back sweetening mead is a great way to add some sweetness and complexity to your finished product. It’s important that you do it correctly, however, so as not to restart fermentation.
Here are the steps for back sweetening mead:
- Make sure your mead has completely finished fermenting by taking hydrometer readings.
- Add 12 teaspoon of potassium sorbate per gallon of mead and stir it in thoroughly to halt fermentation. Potassium sorbate does not kill yeast, but prevents them from converting any more sugars into carbon dioxide and alcohol.
- Once the potassium sorbate has been added, you can then begin adding honey or other sugar sources such as maple syrup or agave nectar until you reach the desired level of sweetness that you want in your mead. Start with small amounts at first (a few tablespoons) and taste test before adding more if needed until you get the flavor profile just right!
- After all of the sugar has been added, let it sit for about a week before bottling up your delicious creation!
- 5 .Once bottled up make sure to store in a cool dark place away from direct sunlight for optimal results!
By following these simple steps when back sweetening your mead, you can be sure that it will turn out exactly how you wanted without having any unexpected surprises due to restarted fermentation!
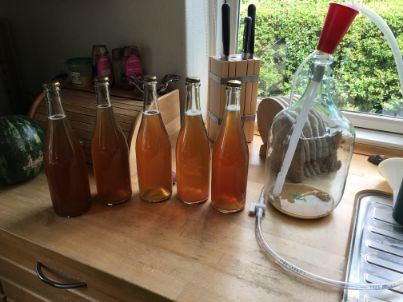
Bottling mead
Bottling mead is the final step in the brewing process and it’s important to do this properly. The goal of bottling is to create a carbonated beverage that can be enjoyed for months or even years after it has been brewed. It’s also important to bottle your mead correctly so that you don’t end up with exploding bottles!
Equipment Needed:
Before you start bottling, make sure you have all the necessary equipment on hand. You will need bottles, caps, a capper, an auto-siphon and tubing, a hydrometer (optional), and sanitizer. Bottles should be clean and free from any debris before use. Make sure they are strong enough to withstand pressure as well as being able to hold liquid without leaking or breaking apart easily. If using screw-top bottles, make sure they are compatible with your capper tool before purchasing them.

Sanitizing:
Once everything is gathered together it’s time to sanitize all of your equipment including bottles and caps. This can be done by soaking them in a solution of one part bleach mixed with four parts water for at least 15 minutes or by using a no-rinse sanitizer such as Star San which only needs contact time of 60 seconds before rinsing off excess foam if needed prior to use . Be sure not over saturate items while cleaning since too much cleaner may leave behind residue which could affect flavor later on down the line when drinking your finished product!
Filling Bottles:
After everything has been cleaned and dried off its time fill each bottle with mead until about 1 inch below the neck then cap each one tightly making sure there isn’t any air left inside otherwise this could cause problems during storage like explosions due possible fermentation activity occurring within closed containers!
Testing Gravity:
To ensure proper carbonation levels take gravity readings prior filling each bottle; if desired add priming sugar according at instructions given earlier when calculating how much sugar was needed per gallon based on original gravity reading taken during initial fermentation stage – usually around 060 points higher than what was measured initially but this varies depending upon recipe used so always double check first just in case!
Storing mead is simple; once filled, store it away from direct sunlight in a cool and dark place where temperatures remain consistent throughout the year, such as a basement, cellar or garage attic space. Let it sit undisturbed for at least two weeks before sampling your first batch – longer aging times will result in better tasting results than shorter ones due to the increased complexity of flavors developed through extended maturation periods. However, patience is key here since waiting is often worth the wait. Once opened up, you can enjoy delicious homemade mead made right in your own home brewery setup.
Once you have finished brewing your mead, it’s time to bottle it and enjoy the delicious results of your hard work! Next, we’ll look at how to properly store and age your mead.
Main Takeaway: Bottling mead is an important step in the brewing process and requires some basic equipment such as bottles, caps, a capper, an auto-siphon and tubing. Sanitizing all of your equipment is essential before use to ensure that you don’t end up with contaminated product.
Before bottling take gravity readings and add priming sugar if desired. Store away from direct sunlight in a cool dark place for at least two weeks before sampling your first batch. Patience will be rewarded when it comes to tasting homemade cider or fruit mead!
Serving Mead
Mead is a delicious and versatile beverage that can be enjoyed in many different ways. It can be served chilled or at room temperature, depending on preference. For those who prefer to enjoy it cold, mead should be stored in the refrigerator until ready to serve.
When serving mead with food, there are some great pairings that bring out its unique flavor profile. Cheese platters make an excellent accompaniment as the sweetness of the mead pairs nicely with creamy cheeses like brie or camembert. Desserts such as apple pie or crème brûlée also work well with mead’s sweet notes and light carbonation.

Mead also makes for an interesting addition to cocktails and mixed drinks! Its delicate sweetness works well when combined with other ingredients such as fruit juices, herbs, spices, bitters and liqueurs. Mead-based cocktails are becoming increasingly popular among home bartenders looking for something new to try!
For those who want a non-alcoholic option but still want to experience the taste of mead, there are now several brands offering sparkling non-alcoholic versions made from fermented honey water without any added alcohol content – perfect for mocktails or simply enjoying on its own!
No matter how you choose to enjoy your mead, whether it is straight up or part of a cocktail, one thing is certain: this ancient drink has stood the test of time and continues to delight drinkers around the world today.
Once your mead is ready to drink, it’s time to serve and enjoy! Now let’s look at how you can get the most out of your mead by learning about the best practices for storing and aging.
Conclusion
Mead brewing is an ancient art that has been enjoyed for centuries. It is a great way to explore different flavors and create something unique. With the right ingredients, equipment, and patience you can brew your own mead at home.
Whether you are looking for a sweet honey-wine or a dry sparkling beverage, mead brewing offers endless possibilities of flavor combinations to suit any taste preference. So don’t be afraid to try it out – with some practice and dedication you will soon be able to call yourself a master of mead brewing!
FAQs in Relation to Mead Brewing
Is mead more alcoholic than beer?
Generally speaking, mead has a higher alcohol content than beer. Depending on the recipe and fermentation process used, mead can range in alcohol content from 8-20% ABV (alcohol by volume), whereas most beers have an ABV of 4-7%. However, some specialty beers may have higher ABVs that approach or exceed those of meads.
Is mead more beer or wine?
Mead is a fermented beverage made from honey, water and yeast. It can be either more beer-like or wine-like depending on the ingredients used in the fermentation process and how it is served. Beer-style meads are usually carbonated with higher alcohol content, while wine-style meads tend to have lower alcohol content and may not be carbonated. Ultimately, it depends on the recipe used for each individual batch of mead as to whether it will taste more like beer or wine.
How long does mead need to brew?
Mead brewing typically takes anywhere from 4 to 8 weeks, depending on the desired flavor and alcohol content. The longer it ferments, the more complex the flavors will be. For a dry mead with an ABV of around 12%, fermentation can take as little as 4 weeks. If you are looking for a sweeter mead with higher ABV levels, then expect to wait 6-8 weeks or even longer before bottling your finished product. It is important to remember that patience is key when making mead – don’t rush it!