Keeving is an ancient art of making sweet cider, and it’s something that every home brewer should learn. In this blog post we’ll be discussing the history of keeving, what you need to make a traditional sweet cider using the keeving method as well as tips for successful results.
Keeved cider is a traditional method of producing naturally sweet, low-alcohol ciders. It involves controlling the fermentation process to stop it before all the sugars are converted into alcohol. This leaves some residual sweetness in the finished product and produces a unique flavor profile that many find desirable.
We will also look at troubleshooting common issues with making a Keeved Cider so that your next batch can turn out perfectly! So if you’re ready to take your brewing skills up another notch and explore the wonderful world of keeving then read on – because in this article we have all the information you need to get started!
Table of Contents:
- Keeving – The Art of Starving Your Yeast!
- The History of Keeving
- What Do You Need to Make Keeved Cider?
- How to Make a Traditional Sweet Cider Using the Keeving Method
- Tips for Successfully Making a Keeved Cider
- Troubleshooting Common Issues With Making a Keeved Cider
- Tips for Making Great Hard Cider with Keeving
- FAQs in Relation to Keeving
- Conclusion
Keeving – The Art of Starving Your Yeast!
Keeving is an ancient technique used to make cider that results in a natural, low-alcohol, and sweeter, more clear, cider.
This process was developed in Ireland and France centuries ago and involves allowing the juice to ferment slowly over several months.
The result of this method is a complex flavor profile with notes of sweetness that can be enjoyed by both novice and experienced cider drinkers alike.
The History of Keeving
The keeving process has been around for hundreds of years, though it wasn’t until recently that its popularity began to rise again among home brewers.
It all started when Irish farmers noticed that their apples, high in calcium, were naturally sweetening during fermentation due to the presence of natural pectinase enzymes released from the apple skins as they broke down during pressing.
These enzymes cause pectin molecules in the juice to break apart and form a pectin gel with the calcium. They racked it off and got a clearer, sweeter, cider!
Benefits Of Keeving:
The main benefit associated with keeving is that it produces ciders with natural sweetness without having to add additional sugar prior to fermentation, as many other brewing processes require.
Additionally, because less nutrients and less yeast growth is needed overall there tends to be fewer off flavors produced during fermentation resulting in smoother tasting beverages free from harshness or yeast taste and bitterness often found in higher ABV ciders made using alternative methods like champagne yeast pitching rates etc.
Finally due the lower nutrient content of keeved cider compared to most modern day brewing techniques you’ll find that these types of drinks tend to have longer shelf lives after bottling too.
What do you need to make keeved cider?
Depending on how you got your juice and the calcium content of your apples, you might need to ad Calcium Chloride and pectinase, but the process might also happen on its own if the fermentation is left untouched at low temperatures!
Making your own keeved cider requires only a few basic ingredients: fresh-pressed apple juice (or other fruit juices), yeast, sugar (optional), and water if needed for dilution purposes.
You will also need the typical cider brewing equipment such as an airlock, vessel, bottles or jugs for storage; and something like Campden tablets or potassium metabisulfite powder for stabilization at the end or for sanitation purposes prior to bottling/kegging your finished product.
How To Make A Traditional Sweet Cider Using The Keeving Method
In short, you perform a natural fermentation for a few weeks after which you encourage the polymerization of pectin and the subsequent precipitation of nutrients from your cider.
To encourage this, you use colder temperatures and add calcium chloride along with a pectinase ezyme.
With a bit of luck, this will be all you need and a brown cap will form on top of your brew. The cider that is left behind will be more clear and have lower nutrient levels than before.
Keeving is a unique and rewarding brewing process that requires careful attention to detail, but can yield delicious results. With the right steps in place, you’ll be well on your way to crafting a perfect hard cider! Next up, let’s look at the basics of how to keeve.
Main Takeaway: Keeving is an ancient method of making cider that results in a naturally sweet, low-alcohol drink.
The History of Keeving
Keeving is a traditional method of making cider that originated in Ireland but has been widely used in France for centuries.
The process involves allowing the cider to ferment naturally, without the addition of yeast. This results in a more complex flavor profile and higher alcohol content than other methods of fermentation.
The history of keeving dates back to at least the 17th century when it was first documented by French winemakers as an alternative way to make sweet ciders with high levels of sugar and acidity. It wasn’t until the 19th century that Irish brewers began using this technique, which quickly spread throughout Europe due to its success.
Keeving was popular in Ireland and Northern France. The process involves allowing the cider to ferment naturally, without the addition of yeast.
Keeving is Also Known as “French Style Cider” is it is most popular in Northern France.
This results in a more complex flavor profile and a higher alcohol content. The history of keeving is shrouded in mystery, but it is thought to date back centuries.
It was likely developed as a way to preserve apples during the winter months when there was no fresh fruit available. The technique began to decline in popularity after World War II, as mass-produced ciders became more widely available.
However, it has experienced something of a resurgence in recent years among craft cidermakers who are looking to create unique products using traditional methods.
If you’re interested in trying keeved cider, be sure to seek out one made by a reputable producer – it can be tricky (and dangerous!) to make at home!
Main Takeaway: Keeving is a traditional method of making cider that relies on natural processes rather than human intervention or additives. It involves allowing the juice to ferment naturally, resulting in a more complex flavor profile and higher alcohol content. Nutrients are added during fermentation to create an environment where only certain types of yeasts can survive, producing desirable flavors while eliminating off-flavors associated with poor quality ciders or wines made without keeving techniques. The finished product is typically dry yet sweet with low acidity levels due to increased amounts of lactic acid created during fermentation.
What Do You Need to Make Keeved Cider?
It involves starving the yeast of oxygen and nutrients, which allows them to produce alcohol without producing carbon dioxide. This process results in a naturally sweet cider with low levels of alcohol.
For those interested in trying their hand at keeving, there are several things you need to get started:
1) Juice: The juice you use for keeving should be fresh-pressed and free from preservatives or additives. You can also use frozen concentrate if it has no added sugar or other ingredients. If your juice contains too much sugar, it will not ferment properly and could spoil before fermentation is complete.
2) Yeast: Any type of wine yeast will work for keeving but some types may produce more flavor than others so experiment until you find one that works best for your taste preferences. Be sure to follow the instructions on the package when rehydrating the yeast prior to pitching into your must (juice).
3) Pectinesterase Enzyme: This enzyme helps break down pectin molecules found in apples which can cause cloudiness in finished ciders if left untreated during fermentation. Pectinase enzymes are available commercially as part of a keeving kit or can be purchased separately online or at homebrew supply stores near you.
4) Calcium Chloride: Calcium chloride helps reduce acidity levels by binding with tartaric acid molecules found in apple juice which makes it easier for yeast cells to consume sugars during fermentation resulting in better tasting ciders with less residual sweetness after fermentation is complete . It’s important that calcium chloride be added early on as adding it later can result in off flavors due to over-attenuation (reduction of sugars). Again this product is usually included as part of a commercial keeving kit but can also be purchased separately online or at homebrew supply stores near you if needed.
Optional materials:
1) Campden Tablets/Sulfites: Sulfites help prevent oxidation and bacterial contamination while allowing beneficial bacteria such as lactobacillus (which produces lactic acid) time enough time to do its job without being overwhelmed by competing organisms present during fermentation . Campden tablets contain sulfite salts like potassium metabisulphite and sodium metabisulphite which release sulfur dioxide gas when dissolved into liquid solutions like water or apple juice; however they should only be used sparingly since excessive amounts may leave behind unpleasant odors and tastes once fermented cider has been bottled up..
2) pH Meter/Test Strips: Measuring pH levels throughout the entire process helps ensure optimal conditions exist for successful fermentations since most yeasts prefer slightly acidic environments between 3 – 4pH range depending on strain used.
A digital pH meter would provide accurate readings whereas test strips offer approximate values only; both are available online through various suppliers including homebrew shops near you..
3) Hydrometer & Test Jar: A hydrometer measures specific gravity (SG), an indication of how much sugar content exists within liquid solution; SG readings taken before starting primary fermentation indicate potential ABV %, while SG readings taken after primary fermentation indicate final ABV% achieved.
A test jar filled with sample must provides enough volume necessary for taking accurate measurements using either device mentioned above.
By gathering all of these supplies in advance, home brewers will have everything they need ready when starting their next batch.
With the right equipment and ingredients, you can make your own keeved cider. Now let’s look at the process of keeving!
Main Takeaway: To get started, you’ll need fresh juice, yeast, pectinase enzyme, calcium chloride, campden tabletssulfites, pH metertest strips and a hydrometer & test jar. With these supplies in hand and careful monitoring of the fermentation process with a pH meter or test strips and hydrometer readings for specific gravity measurements you can brew your own delicious keeved cider at home!
How to Make a Traditional Sweet Cider Using the Keeving Method
Keeving is an ancient Irish technique of making sweet cider. It involves starving the yeast of oxygen and nutrients, which causes them to produce a natural sweetness in the cider. This method produces a unique flavor that cannot be replicated with other methods.
What do you need to make keeved cider? To begin your keeving process, you will need fresh apple juice or freshly pressed apples, as well as some pectinase enzyme powder and campden tablets (for sterilization).
You will also need a fermentation vessel such as a carboy or bucket, airlock and stopper for it, thermometer for monitoring temperature during fermentation, hydrometer for measuring sugar content in the liquid before bottling and finally bottles or containers to store your finished product.
Here’s how you can keeve your own cider at home:
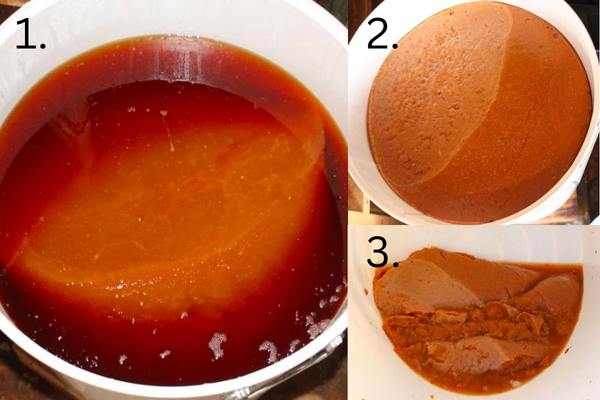
- Firstly, you need to find some good quality, unpasteurized apple juice. This is the key to making a great cider as the enzymes that create the floating ‘brown cap’ are present in the raw juice. You can either buy unpasteurized apple juice or press your own apples.
- If you want to maximize your chances you can add pectin esterase and CaCl yourself.
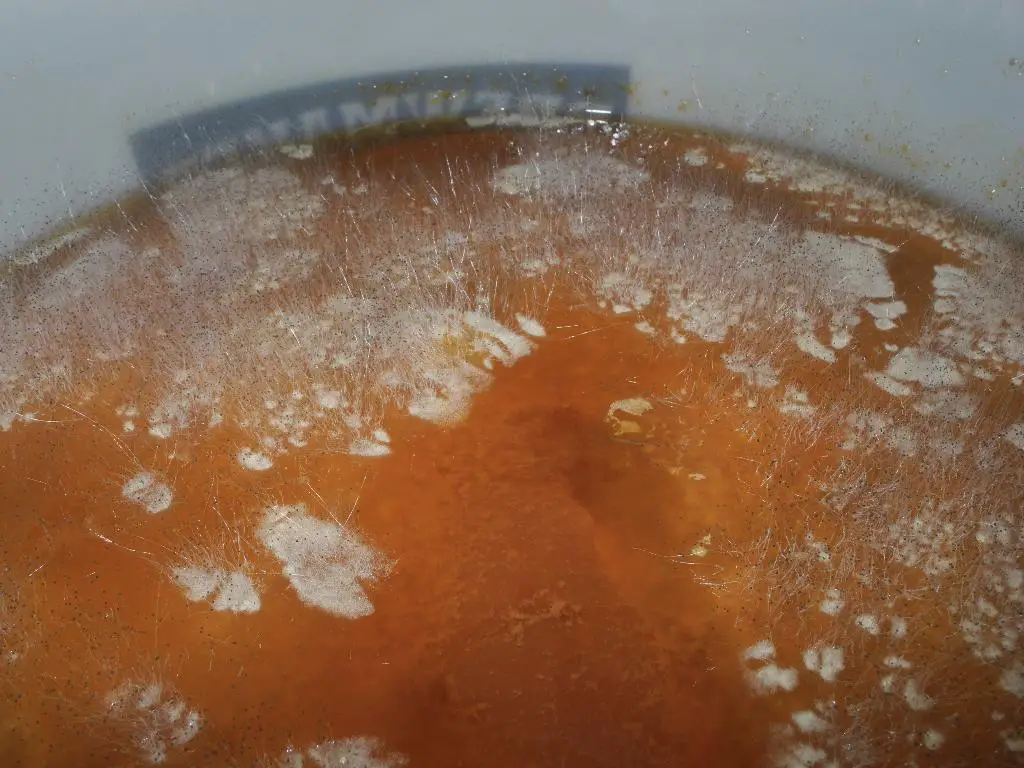
- Once you have your have added the enzyme and CaCl, the keeving process will start. This will create the ‘brown cap’ within a few days. Colder temperatures (<60F) are recommended at this point.
- After 24 hours, the ‘brown cap’ should start to form.
- Wait for at least 10-20 days for the brown cap to fully form and rise to the top.
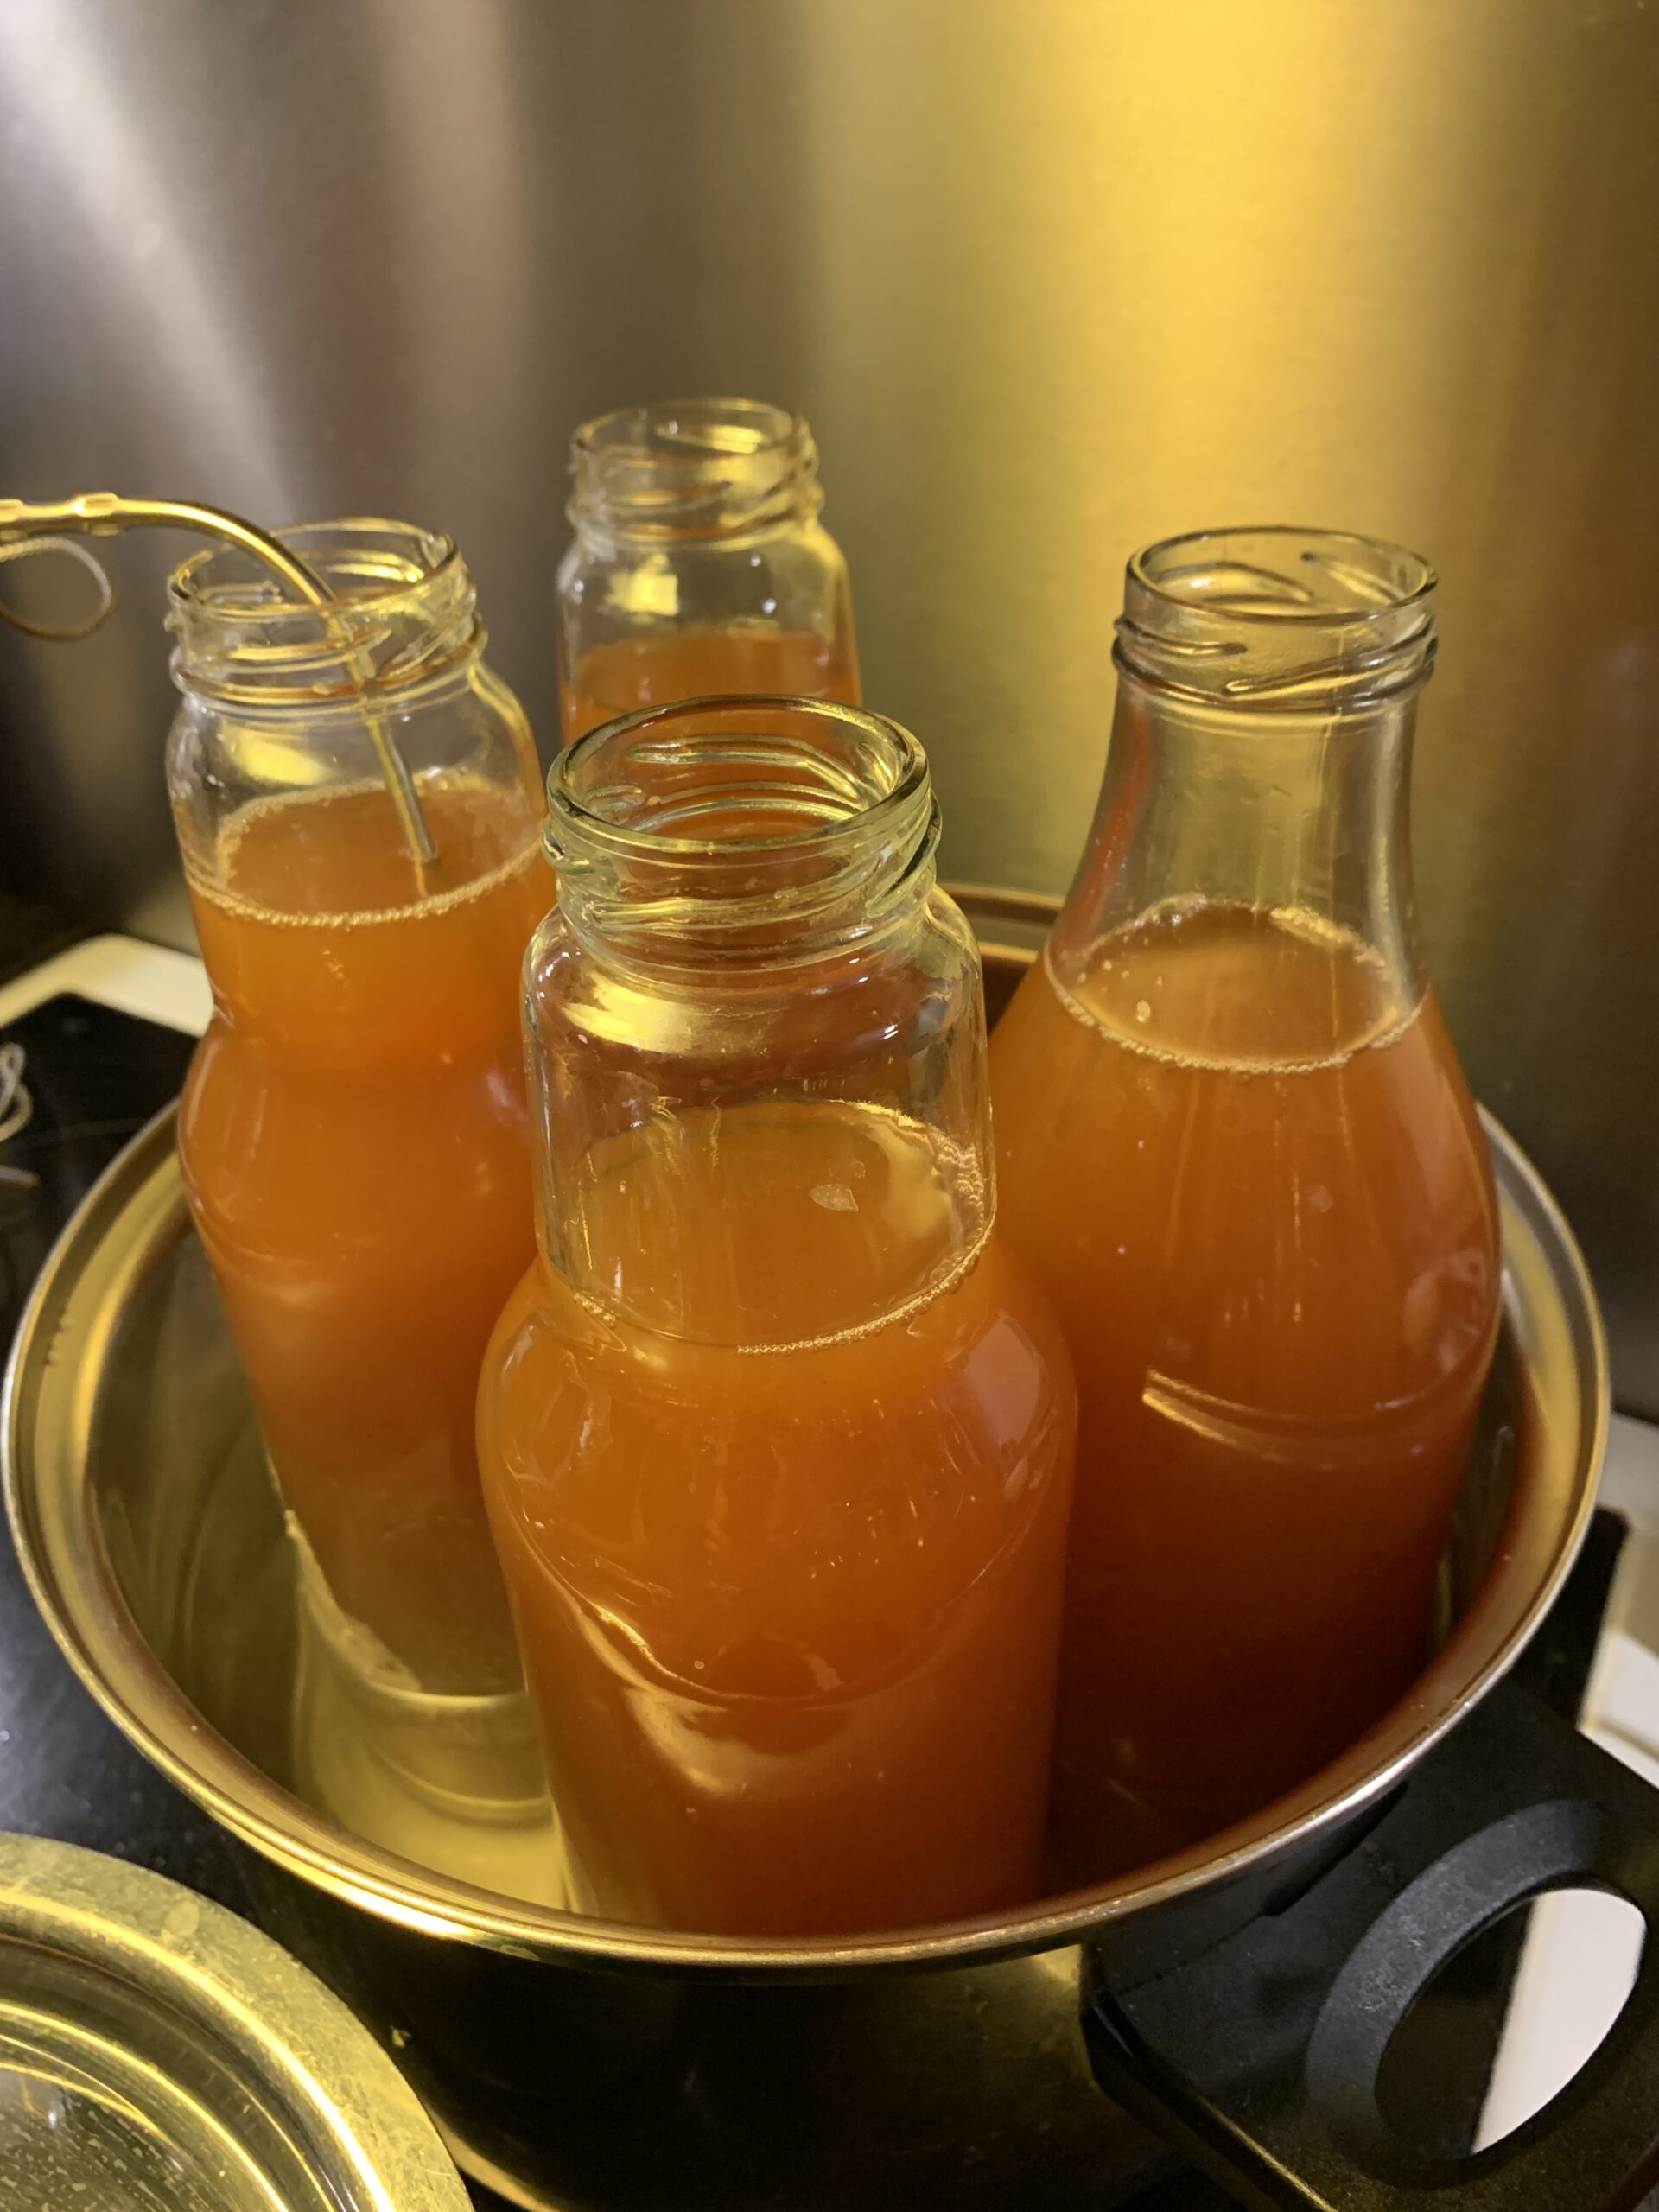
- Now, you need to rack off the juice carefully to a fresh container, leaving the brown pectin mass behind.
Thats it! Let your cider finish fermentation as usual. This will take much longer than without keeving as the yeast will grow slower without much nutrition being left behind!
Finally, allow ciders to rest undisturbed at temperatures ranging between 60-70°F until gravity readings reach specific points determined beforehand, usually somewhere between 0.995-1.000 SG units depending upon individual preferences regarding the sweetness level desired in end products once fully completed stages of maturation have been reached successfully.
Bottle the ciders after reaching these predetermined points and seal caps firmly onto the tops of bottles ensuring tightness is achieved and preventing leakage from occurring later down the road when stored away properly either in refrigerated or cool dark places free from direct sunlight exposure for long periods of time. Enjoy the fruits of your labor!
Making a traditional sweet cider using the keeving method is a challenging but rewarding process. With the right ingredients and knowledge, you can enjoy your own delicious hard cider in no time! Next, let’s look at what type of equipment you’ll need to get started.
Main Takeaway: Keeving is an ancient Irish technique of making sweet cider that involves starving the yeast of oxygen and nutrients. This process requires fresh apple juice or freshly pressed apples, pectinase enzyme powder, Campden tablets, a fermentation vessel, airlock and stopper assembly, thermometer for monitoring temperature during fermentation and hydrometer for measuring sugar content in the liquid before bottling. The keeving method produces a unique flavor that cannot be replicated with other methods.
Tips for Successfully Making a Keeved Cider
Keeving is an ancient method of making sweet cider that has been used for centuries. It involves starving the yeast in order to create a naturally sweet, low-alcohol beverage.
This process takes time and patience, but it can result in a delicious drink with unique flavors and aromas. To make sure your keeved cider turns out perfectly, here are some tips you should follow:
Choose the Right Apples: Not all apples will work well for this method; instead use bittersweet, bitter-sharp or true wild apples. These varieties contain higher levels of tannins which help give the finished product its characteristic sweetness without adding sugar or other additives.
Cleanliness is Key: Before beginning any step of the process, make sure all your equipment is clean and sterile to avoid contamination from bacteria or wild yeasts that could ruin your batch.
Also, do not open the lid of your fermentation container too often as oxygen will enter and increase the change of encouraging mold growth on your pectin gel.
Pay Attention to Temperature: The ideal temperature range for keeving is between 50–60°F (10–15°C).
If it gets too hot during fermentation, then the yeast will become overactive resulting in off-flavors and aromas in your final product.
Too cold on the other hand may cause fermentation to slow down significantly leading to a flat tasting cider with little flavor complexity.
Acidity and pH: The optimal pH for keeving seems to be around 3.7, but it can be done as long as the pH is not in the extremes such as below 2 or above 5. It will be much harder though…
Take Your Time: Rushing through this process can lead to disaster as there are many steps involved that require careful attention such as monitoring pH levels throughout fermentation and aging times after bottling up until consumption day!
Don’t be afraid to take breaks if needed – just remember not to leave it sitting around too long before getting back into action!
When bottling your keeved cider, it is important to be patient during the aging process. Allow the bottles to sit at room temperature for several weeks so that carbonation can occur naturally due to residual sugars still present in solution from when they were added earlier on during primary fermentation stage (if applicable).
Once carbonated properly, store the bottles away somewhere cool such as a cellar or basement where temperatures remain relatively constant year round. This helps preserve flavor quality better than if stored elsewhere at fluctuating temperatures like a refrigerator.
With careful planning and attention to detail, you can make a delicious keeved cider that will be the envy of your home brewing friends. Next up, we’ll look at what ingredients are needed for a successful keeving process.
Main Takeaway: Keeving is an ancient method of making sweet cider that requires patience and attention to detail. To ensure a successful batch, use bittersweet, bitter-sharp or true wild apples; keep all equipment clean and sterile; maintain ideal fermentation temperatures between 60–70°F (15–21°C); and be patient during the aging process after bottling. With these tips in mind, you can make a delicious keeved cider with unique flavors and aromas!
Troubleshooting Common Issues With Making a Keeved Cider
One of the most common issues home brewers face when making a keeved cider is getting too much tannin. Tannins are naturally occurring compounds found in apples and other fruits, and they give your cider a bitter taste.
If you’re not careful, you can end up with an overly tannic cider that’s unpleasant to drink. To avoid this issue, make sure to use ripe apples for your keeving process and monitor the fermentation closely so that it doesn’t get out of control.
Another problem some brewers have is not enough acidity in their finished product. Acidity helps balance out the sweetness of the apple juice and adds complexity to your cider. To increase acidity levels, add tartaric or malic acid during fermentation or after bottling if necessary.
If you find that your cider has an off-flavor or smell, it could be due to bacteria contamination from dirty equipment or improper sanitation practices during brewing.
Make sure all of your equipment is clean before using it and sanitize everything thoroughly throughout the process as well as when bottling/kegging/casking etc.. This will help ensure that no unwanted flavors make their way into your final product!
Lastly, many people struggle with controlling carbonation levels in their ciders when using traditional methods such as keeving.
Carbonation gives ciders a pleasant effervescence but too much can lead to over-carbonated bottles which can be dangerous if opened incorrectly. The best way to control carbonation levels is by adding priming sugar at bottling time; this will allow you to adjust how much CO2 gets released into each bottle depending on the desired sweetness or dryness.
If you’ve experienced any of the common issues with making a Keeved Cider, don’t worry! The next heading will provide helpful tips on how to troubleshoot and get your cider back on track.
Main Takeaway: Keeving is a great way to make hard cider, but it can be tricky. To get the best results, use ripe apples and monitor fermentation closely. Additionally, adding tartaric or malic acid during fermentation can help increase acidity levels while priming sugar at bottling time will allow you to control carbonation levels. Lastly, make sure all equipment is clean and sanitized throughout the process to avoid any off-flavors from bacteria contamination.
Troubleshooting Common Issues in Keeving Cider Making
Unfortunately, there are some common issues that can arise during the process which can lead to poor quality ciders. Here we will discuss how to troubleshoot three common problems in keeving cider making: low pH levels in musts, poor clarity in finished ciders, and off flavors in finished ciders.
Low pH Levels in Musts: The ideal pH level for keeved musts should be between 3.2-3.8; any lower than this may result in an overly acidic or sour tasting cider when it’s finished fermenting. If your must has a low pH level, you can try adding calcium carbonate (also known as chalk) to raise the acidity back up into the desired range before starting fermentation.
Poor Clarity in Finished Ciders: One of the benefits of using keeving is its ability to produce clear and bright ciders without having to use finings or other clarifying agents such as bentonite clay. However, if your cider appears cloudy after fermentation has completed then you may need to add bentonite clay at this stage for clarification purposes before bottling your final product.
To avoid off flavors such as acetaldehyde (which tastes like green apples) or diacetyl (which tastes buttery), make sure all equipment used is properly sanitized prior to use and keep the airlock filled with water throughout the entire fermentation process. This will prevent oxygen from entering the fermenter while it is actively fermenting, which can cause these off flavors.
Troubleshooting common issues in keeving cider making can help you create the perfect hard cider. Next, we’ll discuss ways to optimize flavor and aroma profiles in your finished product.
Main Takeaway: Keeving is a traditional method of cider making that can produce naturally sweet and sparkling ciders. However, there are some common issues that can arise during the process which can lead to poor quality ciders. To avoid these problems, make sure your must has an ideal pH level between 3.2-3.8, use bentonite clay for clarification if needed, and keep all equipment sanitized and airlock filled with water throughout fermentation to prevent off flavors from developing.
Tips for Making Great Hard Cider with Keeving
Making great hard cider with keeving requires a few important steps and considerations. Choosing quality apples for your musts is essential to creating a flavorful, well-balanced cider.
Look for fresh, ripe apples that are free of blemishes or signs of rot.
Avoid using bruised or overripe fruit as this can lead to off flavors in the finished product. Additionally, consider the variety of apple you’re using; different types will produce ciders with varying levels of sweetness and acidity.
Maintaining sanitation during fermentation is also key when making hard cider with keeving. Cleanliness helps prevent contamination from bacteria or wild yeast which can ruin an entire batch of cider if not addressed quickly enough.
Make sure all equipment used in the process is properly sanitized before use and be mindful about keeping everything clean throughout the brewing process to ensure success in producing high-quality cider every time!
Finally, it is important to test gravity readings regularly in order to monitor progress during fermentation and ensure proper carbonation levels once bottling has been completed.
Taking measurements at regular intervals throughout the process will provide insight into how much sugar has been converted into alcohol by the yeast cells; this information can then be used to determine when it is time to bottle the finished product.
With these tips, you can make a delicious hard cider with keeving. Now let’s look at how to store and serve your finished product!
Cider Keeving FAQs
What does Keeving mean?
The technique was developed in France, and the word “keeve” comes from the French verb meaning “to strain.” In order to make keeved cider, apples are first milled and then left to ferment with wild yeasts.
How do you make French style cider?
Making French style cider is a relatively simple process. First, you need to select the right type of apples for your desired flavor profile. You can use a combination of sweet and tart varieties, or just one type if preferred.
Once you have your apples, they must be crushed into a pulp before pressing them to extract the juice.
This juice should then be fermented with champagne yeast for about two weeks in order to achieve the desired level of alcohol content and carbonation.
Finally, it should be bottled and aged for at least three months before drinking so that all flavors are fully developed.
Conclusion
Keeving is a process of cider making that allows for a naturally sweet and unfiltered beverage.
The French and English have been keeving cider for hundreds of years in order to create residual sweetness. Keeving is a process that removes some of the nutrients that yeast need in order to ferment, with the goal of slowing and ultimately stopping the fermentation process.
This fermentation can take up to six months, during which time the remaining solids will settle at the bottom of the vessel while clear apple juice rises to the top.
Once this separation occurs, the liquid is slowly drawn off without disturbing the sediment; this provides most of the sugar for bottle refermentation later on.
The final step is adding more water back into what’s left of the fermented mixture before it’s all bottled together – giving us natural (and delicious) sparkling hard cider!