When you are brewing cider using fruit juice with low amounts of nutrients, it can sometimes be hard to get a proper fermentation going.
Yeast nutrients can help you achieve higher amounts alcohol or help get a stubborn fermentation started or restarted if it gets stuck before all the sugars are used up.
Yeast nutrients play an important role when brewing hard cider but understanding the right amount to use is key for successful fermentation.
We’ll also answer whether or not adding too much yeast nutrient could have detrimental effects on your brew, as well as other essential tips and tricks needed to make sure you get a great tasting product every time!
What is yeast nutrients in brewing?
Yeast nutrients are essential for the fermentation process of brewing cider, wine and beer. Yeast needs more than just sugar to ferment; it also requires amino acids and vitamins in order to grow and thrive. Without these nutrients, yeast will not be able to convert sugars into alcohol as efficiently or effectively.
Yeast nutrient is typically composed of nitrogen-rich compounds such as diammonium phosphate (DAP), ammonium sulfate, urea, magnesium sulfate, calcium carbonate and other trace minerals like zinc oxide.
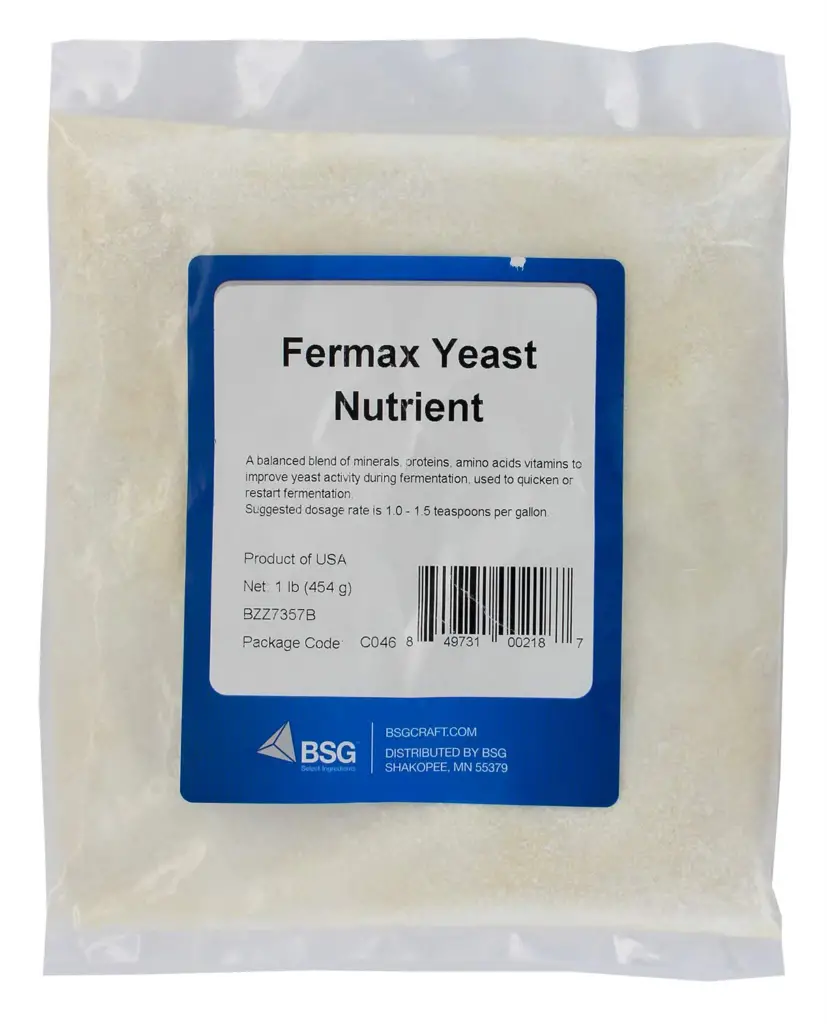
Fermax Yeast Nutrients
These components provide the necessary nutrition for yeast growth during fermentation while helping to prevent off-flavors from forming due to a lack of oxygen or an imbalance in pH levels.
The amount of yeast nutrient used depends on the type of beverage being brewed: ciders generally require less than beers or wines since they have lower sugar content. Generally speaking, 1/4 teaspoon per gallon is enough for most ciders but this can vary depending on the recipe you’re using and your desired outcome.
It’s important to remember that too much yeast nutrient can lead to off flavors so it’s best practice not exceed recommended amounts unless absolutely necessary.

When adding yeast nutrient it should be done at least one hour before pitching your yeast so that all the ingredients have time dissolve completely into solution before introducing any living organisms into the mix which could potentially cause contamination issues down the line if left unchecked .
Additionally, some brewers prefer adding their nutrients at different stages throughout fermentation such as after primary fermentation has completed but prior to bottling or kegging in order ensure optimal flavor development over time without risking any potential problems caused by excess nitrogen concentrations later on down the road.
When deciding what kind of yeasts to use for your cider, there are several options available. These range from ale yeasts specifically designed for cider making all the way up to lager strains meant for more traditional beer production.
However, care must be taken when mixing multiple types together as certain combinations may produce undesired results if not properly monitored closely throughout the entire process.
Yeast nutrients are essential for successful cider brewing as they provide the necessary minerals and vitamins needed by yeast to ferment sugars into alcohol. The next heading will explore the types of yeast nutrients available and how they can be used in cider making.
Main Takeaway: Yeast nutrient is an essential part of the cider brewing process and should be added 1 hour before pitching yeast. It generally requires 14 teaspoon per gallon, but this can vary depending on recipe.
When choosing a type of yeast for your cider, there are several options available from ale yeasts to lager strains; however, mixing multiple types together may produce undesired results if not monitored closely.
• Yeast nutrient is not necessary, but often beneficial for cider fermentation.
• Add one hour before pitching yeast .
• Amount varies by recipe and the type of cider wanted and the yeast strain and apples used.
Is yeast nutrient necessary for cider brewing?
Yeast nutrient is not a requirement for cider brewing, but it can be beneficial in certain situations. If your apple juice has enough nutrients, then you don’t need to add yeast nutrient. However, if the juice lacks sufficient nutrients or if you want to speed up fermentation and increase alcohol content, then adding yeast nutrient can help.
When added during the primary fermentation stage of cider brewing, yeast nutrient helps provide essential vitamins and minerals that are needed by the yeast cells for growth and reproduction. This leads to faster fermentation times and higher alcohol contents as more sugar is converted into ethanol (alcohol).
Yeast also produces other compounds such as esters which contribute to flavor complexity in ciders.
The amount of yeast nutrient used depends on several factors including gravity (the ratio of sugar to water) of your must (unfermented liquid), type of apples used in the juice, temperature at which fermentation takes place etc.
Generally speaking though, most brewers recommend using 1/4 teaspoon per gallon when making hard cider from store-bought apple juice with an OG (original gravity) between 1.060 – 1.080 SG (specific gravity).
It’s important not to use too much yeast nutrient because this can lead to off flavors such as sulfur, bread or rubber aromas due to excessive nitrogen levels in the must or even stuck fermentations where sugars remain unfermented due to overfeeding the yeasts with too many nutrients leading them into shock or exhaustion state where they cannot continue fermenting anymore despite having enough sugars present in solution form available for consumption by yeasts cells .
The best way is always start small and gradually increase amounts until desired results are achieved without going overboard.
In terms of timing, it is best practice to always add any additives such as nutrients before pitching your active dry yeasts so they have time to mix properly with the rest of the ingredients while still being suspended evenly throughout the entire volume rather than settling down at the bottom part of the container causing potential issues later on during the process.
You should also avoid re-pitching the same strain multiple times since this will eventually lead to weaker generations that are less capable of performing their job correctly; therefore, it is recommended to switch different strains every once in awhile to keep things fresh and exciting with new flavors and profiles for each batch made.
Lastly, yes you can use beer yeasts to make ciders however some may produce unwanted phenolic characters so it is better to stick with specially designed ones specifically intended for this purpose in order to get optimal results from your end product possible.
Yeast nutrient is essential for cider brewing to ensure a successful fermentation process and proper flavor. The next heading will discuss the types of yeast used in cider making.
Main Takeaway: Yeast nutrient is not required for cider brewing, but can be beneficial in certain situations. To ensure optimal results when using yeast nutrient, it’s important to use the right amount (14 teaspoon per gallon with an OG between 1.060 – 1.080 SG) and add it before pitching active dry yeasts so that they are evenly distributed throughout the must.
Additionally, beer yeasts can be used for cider making however some may produce unwanted phenolic characters, so specially designed ciders yeasts should be used instead.
How much yeast nutrient for cider?
Yeast nutrient is an important ingredient in cider brewing, as it helps to ensure that the yeast can perform its job of fermenting the sugars in the must into alcohol.
The amount of yeast nutrient needed for a given batch of cider will depend on several factors, including the type and quantity of fruit used, the gravity of the must, and the specific strain of yeast being used. Generally speaking, between 1/2 teaspoon and 1 1/2 teaspoon (2 – 6 grams) per gallon should be enough to get good fermentation results.

It’s also important to note that some strains may require more or less than this amount; for example, lager yeasts tend to need more nutrients than ale yeasts.
Additionally, higher-gravity ciders may benefit from additional nutrients since they contain more sugar for the yeast to consume and the minerals and vitamins tend to be the limiting factor of their growth.
In these cases you may want to add up to 2 teaspoons (8 grams) per gallon instead.
When adding your yeast nutrient it’s best practice not only measure out an appropriate amount but also dissolve it in a small volume of warm water before adding it directly into your wort or must prior to pitching your yeast.
This will help ensure that all particles are evenly distributed throughout your brew and make sure there are no clumps which could cause off flavors or inhibit fermentation altogether. It’s also worth noting that too much nutrient can lead to off flavors so be careful not overdo it!
Finally, if you’re using multiple types of yeasts together then you’ll want to adjust your addition rate accordingly as different strains have different requirements when it comes to nutrition needs during the fermentation process.
Most brewers find success with just one type at a time unless they are specifically looking for certain flavor characteristics by combining two or more varieties together. For instance, many brewers use beer yeasts such as Safale US-05 alongside traditional cider making cultures like Wyeast 4766 Cider Yeast for added complexity in their final product without sacrificing drinkability or clarity.
Using the right amount of yeast nutrient is essential for cider making, as it helps to ensure that your fermentation process runs smoothly and efficiently. The next heading will explore what types of yeast nutrient are best suited for cider brewing.
Main Takeaway: Yeast nutrient is an important part of cider brewing, and the amount needed depends on several factors including type and quantity of fruit used, gravity of the must, and yeast strain. Generally 12 – 1 12 teaspoon per gallon should be enough for good fermentation results, though lager yeasts may need more.
It’s best practice to dissolve it in warm water before adding it directly into your wort or must prior to pitching your yeast. Too much can lead to off flavors so be careful not overdo it! Multiple types may require different addition rates depending on their nutrition needs during fermentation.
Can you use too much yeast nutrient?
Without adequate nutrients, fermentation can be slow or incomplete. But too much yeast nutrient can also have a negative effect on your cider.
Too much yeast nutrient will cause off-flavors in your cider that taste like yeasty bread dough or even sulfur compounds. It may also make it harder to stop fermentation through sulfite addition or cold crashing if too much has been added.

When adding yeast nutrient, start with half of what is recommended and then add more gradually until you reach the desired level of yeast growth (emerging CO2 bubbles!) for your brew.
This will help ensure that you don’t overdo it and end up with a batch of overly sweet, yeasty tasting cider!
It’s best to use only one type of yeast when making hard cider; using multiple types can lead to unpredictable results due to their different characteristics (such as flocculation rate).
However, beer yeasts are sometimes used for ciders because they tend to produce higher levels of esters which give ciders a fuller flavor profile than wine yeasts do. Just remember that these strains need more nutrients than wine strains so adjust accordingly when adding them into your mix!
Finally, keep in mind that most commercial ciders contain very little actual sugar content – instead relying on artificial sweeteners such as sucralose or corn syrup solids – so if you’re looking for a dryer style cider then reducing the amount of sugar/yeast nutrient added is key!
In summary, while some amount of yeast nutrient is necessary for successful fermentation in hard ciders, too much can result in off-flavors and difficulty stopping fermentation processes such as cold crashing or sulfite addition.

It is recommended to start by adding half the recommended dosage and increase gradually until desired sweetness/carbonation levels are achieved. Additionally, it is suggested to use just one type of strain (beer vs wine) when making hard ciders and reduce sugar content if aiming for drier styles.
Yes, using too much yeast nutrient can lead to off-flavors and an overly sweet cider. Therefore, it is important to understand the right amount of yeast nutrient needed for your specific cider recipe. Next up, let’s look at how temperature affects the fermentation process.
Main Takeaway: When making hard cider, it is important to be mindful of the amount of yeast nutrient used.
Too much can lead to off-flavors and difficulty stopping fermentation processes. To avoid this, start with half the recommended dosage and increase gradually until desired sweetnesscarbonation levels are achieved.
Additionally, use just one type of strain (beer vs wine) and reduce sugar content if aiming for drier styles.
When to add yeast nutrient to cider?
Yeast nutrient should be added when you add the yeast, but also when fermentation appears to have stalled or stopped. Adding more yeast nutrient can help restart a stuck fermentation.
It can also help prevent the smell of sulphur in primary fermentation!
When adding the initial dose of yeast nutrient, use about 1/4 teaspoon per gallon (3.8 liters) of must or juice for dry yeasts and 1/2 teaspoon per gallon (3.8 liters) for liquid yeasts.
This will provide enough nutrition for the yeast during primary fermentation and allow them to finish their job properly without any issues due to lack of food sources in the must or juice itself.
If your cider has been fermenting for several days with no signs of activity, then you may need to add additional amounts of yeast nutrient at this point in order to get things going again. The amount needed will depend on how much sugar is left in your must or juice.
If there’s still plenty left then you won’t need as much compared with a batch where most of the sugars have already been consumed by the yeast cells before they became dormant due to lack of nutrients available in their environment.
Generally speaking though, adding another 1/4 teaspoon per gallon (3.8 liters) should do just fine here too unless your recipe calls for something different based on its specific needs and ingredients used throughout production process from start till now!
It is also possible that multiple doses may be necessary depending on how long it takes before active fermentation resumes after each addition. Some batches may take longer than others, so patience is key.

However, make sure not to overdo it either as too much nitrogen can lead to problems such as off-flavors once the finished product gets bottled up and ready for consumption.
Adding yeast nutrient to cider helps ensure a healthy fermentation process and successful end product. Next, we’ll explore the types of yeast that are suitable for making hard cider.
Main Takeaway: Yeast nutrient is an essential part of cider brewing and should be added when adding the yeast as well as if fermentation appears to have stalled. The amount needed depends on how much sugar is left in the must or juice, but generally 14 teaspoon per gallon (3.8 liters) should suffice. Multiple doses may be necessary depending on how long it takes for active fermentation to resume after each addition, but make sure not to overdo it so that off-flavors don’t occur once the finished product gets bottled up and ready for consumption.
How often should I add yeast nutrient?
It helps the yeast to convert sugar into alcohol and carbon dioxide, which gives your cider its unique flavor and aroma. Without it, fermentation will be incomplete or slow down significantly. So how often should you add yeast nutrient?
The answer depends on the type of cider you are making. For most ciders, adding yeast nutrients once at the beginning of fermentation is enough for a successful brew.
However, if you’re making a high-alcoholic wine or cider (over 10% ABV), then it might be necessary to add more than one dose of yeast nutrients throughout the process in order to keep fermentation going strong until completion.

When adding additional doses of yeast nutrient during higher-alcohol fermentations, make sure that there is still some sugar left in your must (unfermented juice).
You can tell this by checking the specific gravity (SG) with a hydrometer – if it’s still relatively high compared to what it was when you started out then there’s likely still some unfermented sugars present that need help from extra nutrients in order to complete their conversion into alcohol and CO2 gas bubbles.
It’s also important not to overdo it when adding additional doses of yeast nutrient as too much can lead to off flavors such as sulfur aromas and harsh bitterness due to excess nitrogen compounds being produced by stressed out yeasts trying desperately hard but unsuccessfully converting all those sugars into alcohol before running out steam completely!
To avoid this problem altogether just stick with one dose at the start unless absolutely necessary otherwise – your tastebuds will thank you later!
Finally, bear in mind that different types of yeasts may require different amounts or kinds of nutrients so always read up on each strain before pitching them into your wort/must. This way you will know exactly what they need beforehand instead having any nasty surprises along the way.
Adding yeast nutrient to your cider is an important part of the brewing process. Knowing when and how often to add it can help ensure a successful batch of hard cider. Next, we’ll look at what type of yeast should be used for cider making.
Main Takeaway: Yeast nutrient is an important part of cider brewing and should be added once at the beginning for most ciders. However, if making a higher-alcoholic cider (over 10% ABV), it may be necessary to add additional doses throughout fermentation to ensure successful completion.
How do you best use yeast nutrient for cider?
It helps to ensure that the yeast has enough nutrients to properly ferment the sugars in the juice and produce alcohol. Yeast nutrient can be added at different stages of fermentation, depending on what type of cider you are making.
For dry ciders, it is best to add yeast nutrient during primary fermentation when the sugar content is highest.
This will help ensure that all of the sugars are fermented and not left behind as residual sweetness in your finished product. For sweet ciders, it is best to add yeast nutrient after primary fermentation has completed so that any remaining sugar can be converted into alcohol without over-sweetening your final product.
When adding yeast nutrient, use 1/4 teaspoon per gallon (3.8 liters) for dry ciders or 1/2 teaspoon per gallon (3.8 liters) for sweet ciders. Be sure to dissolve the powder completely before adding it directly into your fermenter or carboy with a sanitized spoon or measuring cup. Stir gently but thoroughly until all of the powder has been incorporated into solution and then allow your cider to continue fermenting normally until completion.
It is important not to use too much yeast nutrient as this can lead to off flavors in your finished product due to excess nitrogen compounds being produced by the yeast during fermentation which can cause bitterness and astringency.
Generally speaking, using more than one tablespoon per gallon (3 liters) should be avoided unless you have specific reasons for doing so such as high gravity wort or very low temperature conditions where additional nutrition may be necessary.
For certain strains of yeasts used in cider production processes like champagne yeasts, higher amounts may be needed than most other ale and lager varieties typically used by homebrewers.
However, it is always best to double check first what kind of strain you are dealing with before proceeding further since many types available nowadays often come pre-packaged with their own proprietary blend already included inside them even if they don’t say anything about it specifically on their labels.
It is better to be safe than sorry afterwards when things go wrong unexpectedly instead. Hopefully this information was helpful overall; good luck out there everyone!
Adding yeast nutrient to cider is an important step in the cider-making process, as it helps ensure that your fermentation is successful. Next, we will explore the different types of yeast available for use in cider brewing.
Main Takeaway: Yeast nutrient is an important component of cider brewing, and should be added at different stages depending on the type of cider being made. Dry ciders should have 1/4 teaspoon per gallon (3.8 liters) during primary fermentation, while sweeter ciders can get up to 1/2 teaspoon per gallon (3.8 liters) after primary fermentation has completed.
Too much yeast nutrient can lead to off flavors in your finished product, so it’s best not to use more than one tablespoon per gallon (3.8 liters).
Conclusion
In conclusion, yeast is an essential part of cider making. Yeast nutrients are necessary for successful fermentation and should be added at the right time and in the right amount.
Different yeasts can be used together to create unique flavors, but beer yeast is not recommended for cider brewing.
With proper knowledge and understanding of how to use yeast nutrient in cider making, you will have a better chance of producing delicious hard ciders that you can enjoy with friends and family!
Are you ready to take your cider brewing to the next level? ExpertBrewing is here to help. We provide a comprehensive guide on yeast selection and use for hard cider making, so that you can create delicious ciders every time!

